WORLD DIPLOMACY CHAMPIONSHIP 2017 RECAP

On the Top Board of WDC 2017 in Oxford, UK

by Mario Huys


St. John's College, the venue for the WDC 2017 hosted by Dan Lester.

This recap will only feature one video, located at the very end, but that gets compensated with a great amount of commentary by all the participants and the occasional observer. The game history is nearly complete, but note that notably the Austrian and Turkish moves were derived rather than recorded, as no notes have survived. If you would rather see the moves as a single file, here's a link to the PDF, which will open in a different tab.

Toggle:
  • All Blurbs
  • All Spring/Fall Maps
  • All Comments on Play
  • All Summer/Winter Maps

The Oxford Method

Blurb Starting Map
Game Start

Spring 1901

Blurb Spring Map Comments Summer Map
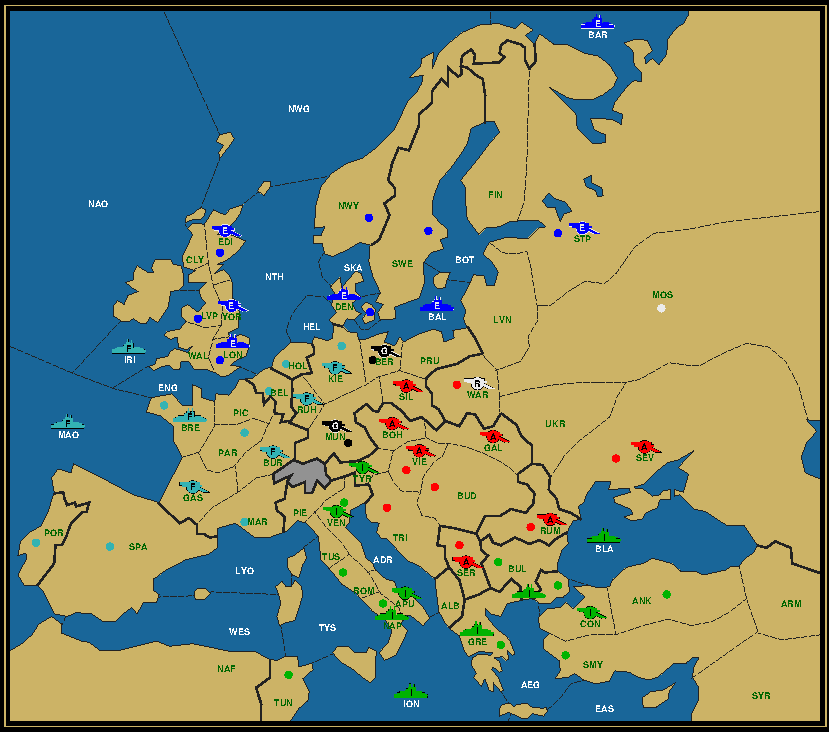
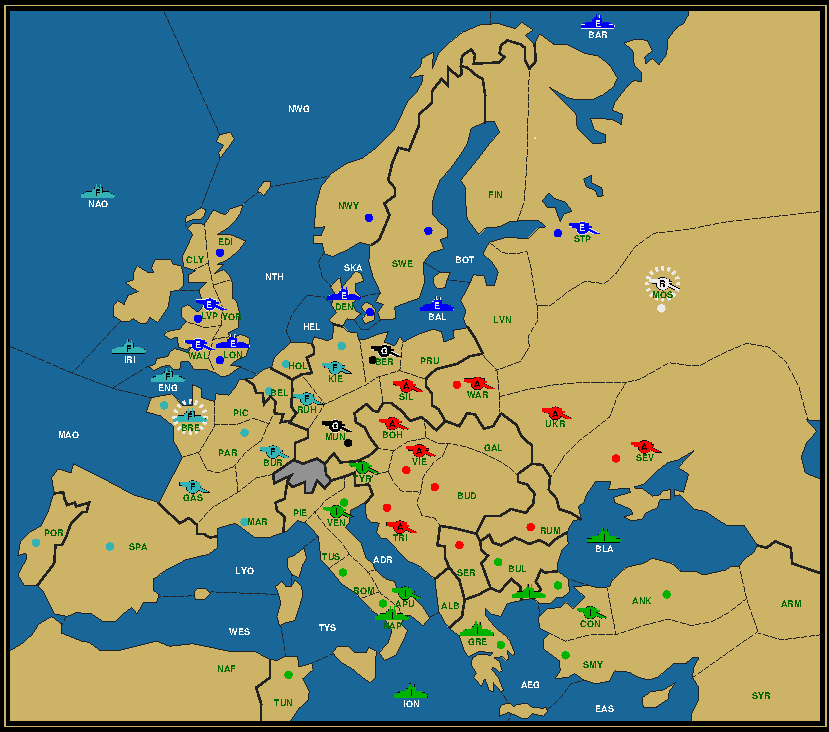
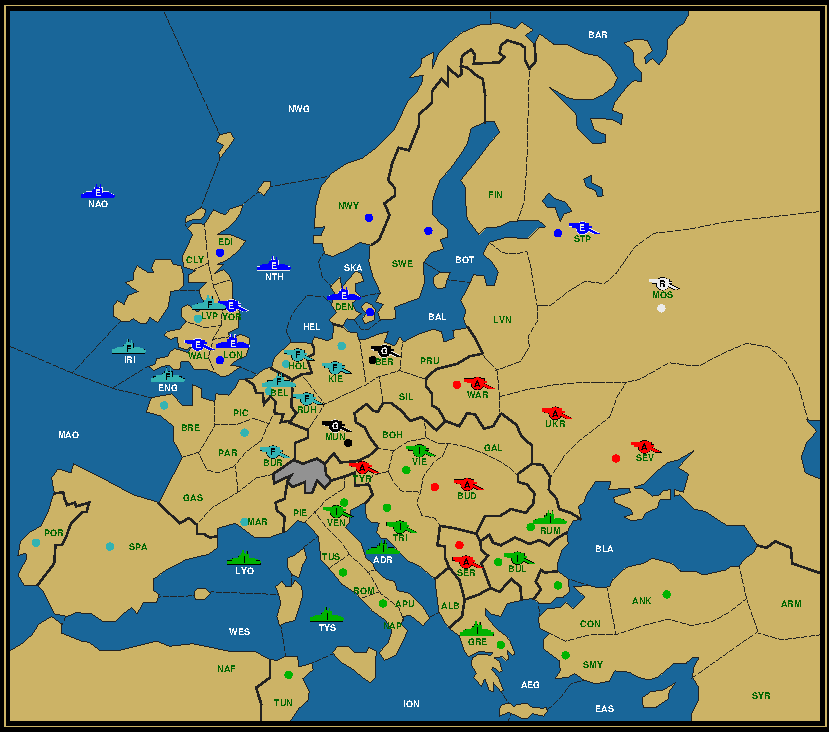
Thanks to Marvin Fried taking pictures on each turn and Markus Zijlstra for collecting order sets from all parties, we now have a fair amount of data on the evolution of the WDC 2017 top board. We might not have every move, but more importantly we know the position at the start of every season. Time for a review.
I will be posting the complete game one season at a time at a rate of about 2 seasons per week, with pictures of the positions before and after, as well as the moves as they are known (or can be deduced). I invite every participant, Chris Brand (Austria), Nicolas Sahuguet (England), Marvin Fried (France), Ruben Sanchez (Germany), Douglas Moore (Italy), Peter Yeargin (Russia) and Conrad Woodring (Turkey), to comment on their actions (negotiations, thoughts, moves) that season. Everyone else can freely comment at any time. These comments will be compiled in an article for the F2017M issue of the Diplomatic Pouch planned for October.
I know it will be hard to recall a game weeks after it has been played, but try your best. Future generations will appreciate the effort.
With no further ado, let's get the show rolling. It's Spring 1901, the powers have been chosen, negotiations begin. Who did you approach and how? How did you feel about your power choice? Etc.
Spring 1901

Comments

Andrew Goff Clearly all the openings are rubbish except for the Italian one.

Mario Huys Most of the trouble points, like Eng, Bur and Gal, are carefully avoided. Is that a common theme in high stake games?

Chris Brand That's a very good question. I don't know the answer, but it would be interesting to find out.

Andrew Goff I agree an excellent question. Game Theory says that "trouble points" are more trustingly resolved when repeat interactions are a factor. I'd expect this to be the case with players in tournaments and that this would be a major difference between FTF tournaments and regulation PBeM play*. Sadly, there are no statistics to support the theory. I'd expect to see this evolve over the next few years as technology develops to track tournament games in more detail than centre count.
*Worth noting, it's not about quality of players — just repeat interaction… so I didn't cite social FTF play because in a small social group the same evolution would be seen as in FTF tournaments… even if the play never reaches any kind of decent quality.

Douglas Moore Okay, so I love playing Italy, and I was very excited to play it. As an immediate neighbor, I very much enjoy Chris Brand as Austria. We play well together, and I like working with him — no bullshit, strong tactics, and shared understanding of the game. I have played before with Nicolas Sahuguet, Conrad Woodring, and Peter Yeargin, and have a lot of regard for them. Marvin Fried and Ruben Sanchez were new to me, though I'd shared a drink and a quick conversation with Ruben the night before.
My early conversations were easy: I'm bribable as an ally for a fifth supply center. France and I agreed to DMZ the West and avoid the hell out of each other. Austria and I agreed to bounce in Trieste — I wanted Chris to not be nervous about me as his neighbor so we didn't waste time and moves being paranoid. Turkey and Russia both approached me about working with the other long-term as well, but no one was decisive. Italy can drive action in the game by how fast and where they decide to move, and I like doing that and controlling the pace. In this instance, I felt the right move was to lock down a flank, and wait and see who really wanted me as a partner. I wasn't going to move any faster in '01 without pushing into Austria anyway, so there was no reason to drive conflict until it was advantageous for me.

Conrad Woodring I wasn't decisive! You sir are remembering our conversation incorrectly. I said that I like to pick a direction and go. I dislike all the wait and see, and let's slow play it, that had been going on all tournament.
Immediately from the start I wanted to go after Austria. You and Peter didn't want to decide on anything.

Douglas Moore Conrad Woodring: Let me re-phrase — no one was decisive regarding a non-Austria target. :-)

Mario Huys Credit where credit is due. The fact that we have the positions for each season, is thanks to Marvin Fried and his trusty camera.
Now, Marvin, I have a question for you, going back on an earlier observation. The way you opened, you gave each of your neighbors, Germany, England, Italy, the possibility of threatening one or more of your home centers. How certain were you that they would all move away? Or was there a plan B?

Marvin Fried Thanks very much Mario Huys for setting up this discussion and asking some very probing questions. I, like many others, are looking forward to everyone who was on the top board participating in this forum!
Starting pre-1901, I had the most points going into the final so I picked my country first. As this was my first tournament played to completion, I figured I would need a strong and defensible power as all of the other top board players were battle hardened national and world champions! I therefore chose to pick my country first, even if this meant that in a draw I would lose out. Picking France, I figured I would be in a good position to survive at least into the mid-game if all went well.
Although I do not meta-game as my friends in the London Diplomacy Club will hopefully attest to, it is (unfortunately) almost a requirement in tournament play to do so, at least to a minor degree. Unfortunately I pulled the short straw in this respect by drawing first — England (Nicolas Sahuguet) and Italy (Douglas Moore) were not known to me from previous games, while Germany (Ruben Sanchez) had been my distant adversary of my third game as Turkey to my Germany. I had not played with Russia (Peter Yeargin) before either, meaning forging a closer relationship with him would be hard. All of those I knew were on the other side of the board — namely Turkey (Conrad Woodring) and Chris Brand (Austria) with whom I worked extremely well in executing a Key Lepanto without stabs on my second board of the WDC.
I should say that I knew all of the other players from reputation and by following their impressive careers, and that it was an honor to play with such an incredibly high calibre group of players.
I played very differently on the top board than I did the rest of the tournament, and that is to say I played too conservatively at the end. While I tried hard to have an active early alliance with a clear goal in mind, I found that it was very difficult to get people to do much of anything — it was very conservative play all around in the west. I expended an enormous amount of energy just trying to make things move in any direction (not necessarily in mine), but felt like we were stuck in the west by virtue of our own fears. I was later told that I was being ‘too directive’ in my requests, but I did not hear any real suggestions for strong tempo play come my way despite asking and asking often.
This issue (around the slowness of the west, and my own inability to overcome it) will feature many times as the discussions about the game progress, but I will try to keep my comments to the season at hand. Suffice it to say that the west kept me occupied for longer than I would have liked, as I would have preferred to be involved on a diplomatic level on the eastern matters as well. Sadly it was not to be, and that probably hampered me in the mid-game when AI stopped my advance through the center.
I thought the only chance I had would be to protect one of my flanks. In my experience, I have come to believe that an early FI war does not help either of those powers (though Italy, if things are going well in the east, is in a marginally stronger position), and so developed a very close non-aggression pact with Italy with a clear set of demilitarized zones. I didn't want to get bogged down in the western med like Chris and Nathan did in WDC 2016. This would set me up for a free hand in the north, and though I was frequently warned about Doug's danger as Italy, I felt confident that he would not attack unless I grew too fast too quickly and would see him coming.
And this leads me to S1901, which as was pointed out saw lots of openings which could have resulted in stabs: Eng/Bur/Pie were all left DMZ. The Pie move was an easy call because I felt like I could work with Doug, and as it turned out I did throughout. Looking back I'm surprised that I didn't open to Gas but rather to Spa — perhaps excitement or fatigue got the better of me, as it would do in much of the final. Eng/Bur was a tricky one. I generally cover Bur as France and take a risk over Eng, but in this case I had trouble reading both players. Neither wanted to really start a strong early alliance so I had to take bilateral confidence and security building measures in order to start building trust. I figured it was a long game and I needed friends, so was willing to take some risks to make them. I wanted to work with Germany to take down England quickly, but Germany was non-committal. I therefore tried to work with both to see where we go, while at the same time trying to engineer some kind of upset to take advantage of the resulting situation. This meant trying to get Russia and England to open north in order for me to work with Germany to take down England and then be in a commanding position over Germany while he was engaged in Russia. Russia didn't open north, unfortunately, so I had to wait until 1902 when the inevitable covering build in StP would certainly result in some tension with England.
Bel remained an interesting location, as it always is, and I was content in having it remain empty as long as possible. That was my goal; I had absolutely no intention of taking Belgium in the first year unless attacked from another flank.
Most of all, I did not want to be the first early leader, or possibly even the second, as I feared that would ruin any chance I had. Sadly everyone else was playing the same game. I have to echo some comments already made that the top board was slow moving and no one wanted to commit, which surprised me. Perhaps at this level it's more common to see a 'wait and see' approach than in games with less at stake.
In answer to the question, how certain was I that my neighbors would move away, and was there a plan B: Well I was pretty certain, having read the three players (correctly as it turns out), that none of them would come after me first. They clearly wanted to see what I would do, and doing nothing threatening was the plan, while at the same time I figured they didn't want to grow too quickly or seem too aggressive either and therefore wouldn't attack me first either. Or maybe it was just luck. I put the chances of being attacked out of the gates by Italy at 20%, by Germany at 30%, and by England at 40%. I always have a plan B, which was that if one did attack me, I would still be able to pick up Spa/Por (or at least one) and cover the affected center. The board would then see the very aggressive opening by the attacking player without the ability to actually cripple me, and rather than jumping on board would hopefully be open to my suggestions of cooperation to try to bring the attacking player down (to all of our benefit). The bigger problem, as it would turn out, was that I oddly didn't have enemies by the end of 1901! But at the same time no one would want to work with me to pick a fight we could jointly win against a third power, which was very frustrating indeed.
But more on that later when you put the next set of orders up! :-)

Chris Brand I may be the person who knew the other players the best, particularly the players in the east. Austria's always a little tricky at the start, and as the defending champion I wouldn't have been particularly surprised to see the eastern powers agree to take me out quickly. I wasn't going to play full hedgehog, though — I always prefer to defend myself diplomatically than militarily. I did push to take Conrad Woodring out, and both Peter Yeargin and Douglas Moore seemed amenable to the idea. I did hope that Doug would prefer to go west, but he didn't seem interested. I also doubted that he'd want to extend himself too far east, so I offered to hand over Greece in return for his help against Turkey. That was probably a first turn discussion, I think. I believe Peter suggested the DMZ in Gal (IIRC, he led me to believe that he'd send Moscow north), and I thought that he'd follow through. I didn't want Doug in Tyrolia, so I was happy to agree to a bounce in Trieste. All told, I was mostly waiting to see whether Peter, and to a lesser extent Conrad, would actually start to fight like I wanted them to.

Summer 1901

Fall 1901

Blurb Fall Map Comments Winter Map
We have five complete order sets for every season. Only the Austrian and Turkish are sometimes missing. I will take a stab at these for the sake of the matter. If my assumptions are wrong, please point them out and I will correct them.
Fall 1901

Comments

Mario Huys Conrad Woodring, you tried to get something going against Austria in the Spring turn. But Russia clustered his forces around Sev, instead of moving to Gal or even StP. Do you now change tack, butter up Austria and move everything against Russia?

Conrad Woodring I was trying to get all three of them to work with me. Basically no one was willing to do anything. I told Russia that I wasn't getting anything solid from anyone and that he wasn't making any moves against Austria so there was no way I wasn't going to Black Sea. Generally as Turkey, you cannot afford to lose Black Sea whereas Russia doesn't lose much. I usually take the stance as Turkey that we either bounce Black every turn or I get Black Sea.
With no one really talking to me about any plans I was anticipating having to defend and offer supports to one neighbour against the other to try and break things apart. It didn't work out though.
My move to Rumania was because Russia told me he was supporting himself. Austria didn't offer me support so I was going unsupported. Russia could take Rum or defend Black Sea. We were both honest with each other about our moves and we did as we said.
But I was not feeling a lot of love from anyone in my region.

Marvin Fried F1901
The three-way bounce in Belgium was agreed. No one wanted the center (to avoid early leader syndrome) and me in France least of all. I think England would have been happy for some support into it but neither Germany nor I wanted to give it. At this point I was still very keen to work with Germany against England, and I saw the southern Russian opening as an opportunity to keep Russia out of the English spoils, get Germany embroiled in a war with Russia over a Swedish bounce, and deal with England jointly. Germany however did not want to pick a fight with Russia early on, so just as in the first turn the second turn was one of ‘playing-it-safe’. I have to echo Conrad’s views that also on my half of the board no one really wanted to do anything and no one was willing to commit to an alliance and create some tempo, despite my best efforts at encouraging movement.
I took Por with the fleet and not the army (I usually like to put Mao-Spa/sc and take Por with the army) because I didn’t want to alarm Italy unnecessarily. Relations with Italy were very good from the start and I wanted to keep things that way until I figured out who I would work with in the north. Sadly that never became clear so the alliance with Italy remained until the game ended.
I was pleased to see two Russian builds as a counterweight to a possible EG, and also pleased with the certainty in my view that he would have to build something in the north. I actively encouraged a fleet Stp/nc but again it was deemed too risky by Russia. Builds in the west were typical. I tried to get England to build F Edi in order to start a northern campaign, but he was too concerned about me and built F Lon instead. I now faced three German armies on my border to two French ones, but at least was glad I could bring the Spa army back quickly. The Italian builds were fine, we had agreed no fleets in Tus and no fleet build in Rom if I remember correctly, in exchange for no fleets in Spa/sc and no fleet build in Mar. The DMZ was wide and widening.
I was concerned at this point that EG might form an alliance and work against me (and that Italy would come after me when he saw what was happening), so my diplomacy was focused on maintaining peace with Germany, encouraging a GRF against England (now that he had allowed Russia into Sweden), and getting Russia to take Norway no matter what Germany did. And I did not lay claim to Belgium as I wanted it either as a compensation space for when RG take on England and to represent a fair division when England went down. Sadly I first had to get Germany to agree to any course of action against England, which was not easily forthcoming. I had S1902 for which I could still claim neutrality in a war against England, but after that I would have to commit too. But the delay was useful since I didn’t really feel like Germany wanted to move against anyone really. I suggested Germany builds two fleets and that we have a secured center around Bur/Mun but he declined. As would often be the case, I would be too ‘directive’ but when the suggestions were turned down there was not much apart from ‘wait and see’ that came back as counterproposals.
Out of all of my neighbors I was most concerned about England, and therefore the majority of my diplomatic machinations were designed to isolate him. This would bear limited fruit in the ensuing years.

Nicolas Sahuguet Here are my thoughts for the start of the game.
I knew most people on the top board but Marvin. I don’t even think I had talked to him before the morning of the top table. I was pretty familiar with all the north-American players, having played quite a bit with them in the past. In fact, I had played Conrad in R1 and Peter in R3. I have known Ruben (the other French player) for a long time (starting with my days playing on the internet at 18centres.com), but I had little experience playing him FTF. I think that we had only played a couple of games together and at opposite sides of the board.
Being second is not easy because you cannot guarantee 1st pick and then it is not clear what the best picks are. Choosing country vs choosing neighbours is not clear.
I decided to pick England with Marvin and Ruben as neighbours, first because I have better results with western countries and I did not want to pick Austria, Russia or Turkey with no knowledge of who my neighbours would be. Italy was the other obvious choice, but I am not very good with Italy…
The plan was to take advantage of my neighbours later in the game. Marvin is relatively new to the hobby and I thought that the pressure may get to him at some point in the game. Ruben is very experienced but really wants to win a top table (and would deserve it) but that may obscure his judgment. My 2-cent psychology analysis was spot on but it backfired big time. More on that later.
I also expected Doug to pick Italy, a country that he plays well. He also has tendencies to go west which would be good for me. On this, I was wrong. I would be interested to know if he decided from the start to stay away from France to paralyze the West.
1901: I wanted to start slow, make friends and see how things were developing before making irreversible decisions. Of course, if France or Germany would support me into BEL in F1901, they would get an ally. Both Marvin and Ruben declined my proposal and spent the rest of the game complaining that I did not propose a strong alliance. If you want a strong alliance with England, give him BEL in 1901 and never look back…
In any case, I took NWY with my fleet to make friends with Russia so that he could focus on the south and keep the balance there. If he was to get too big, Russia is easy to control. Germany and Russia seemed friendly telling me that peace in Scandinavia was something everyone wanted.

Ruben Sanchez Wouhaouh, I guess I will need to find some time to answer properly to the comments above of Marvin and of Nicolas.
On the final table I just played Marvin in this tournament once, but he was Germany and me Turkey. Same for Chris, only played once in Oxford but at the opposite side of the map. Never played with Doug, Peter or Conrad.
I knew Nicolas better, and apparently Nicolas does not remember it, but we played once in Paris: he was Austria and I was Italy. Nicolas won by one center. In Milan I also played against him (last round of qualification). I was securing on my side the final at the Milan WDC.
So basically I did not know much about the players.
S1901 France wanted to go on England. Russia was more neutral, wanting England and I to go after France. England showed no intention, Nicolas did not even ask for BEL in 1901. With this configuration we agreed with France to leave BEL empty.

Winter 1901

Spring 1902

Blurb Spring Map Comments Summer Map
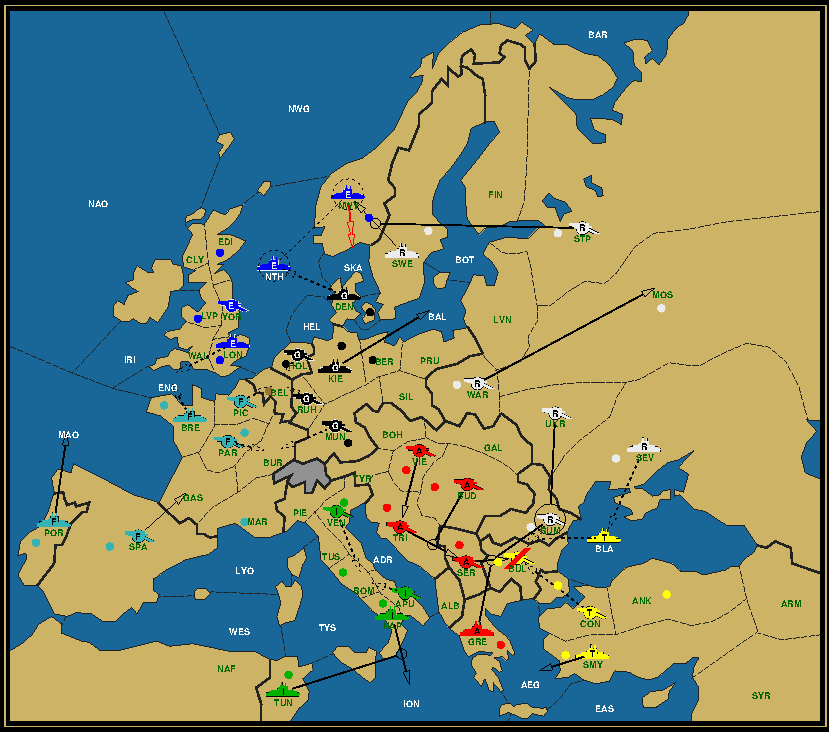
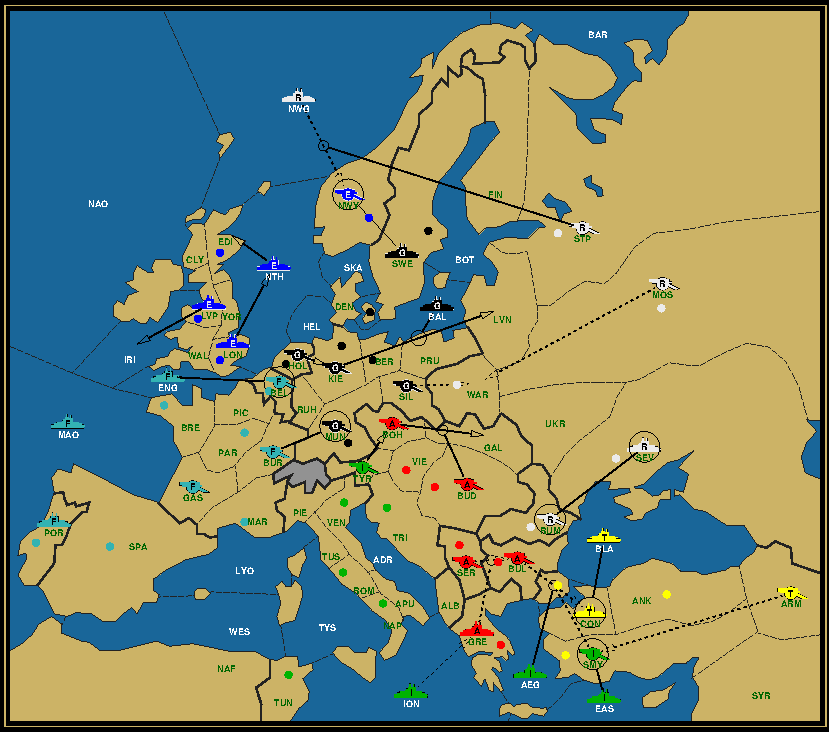
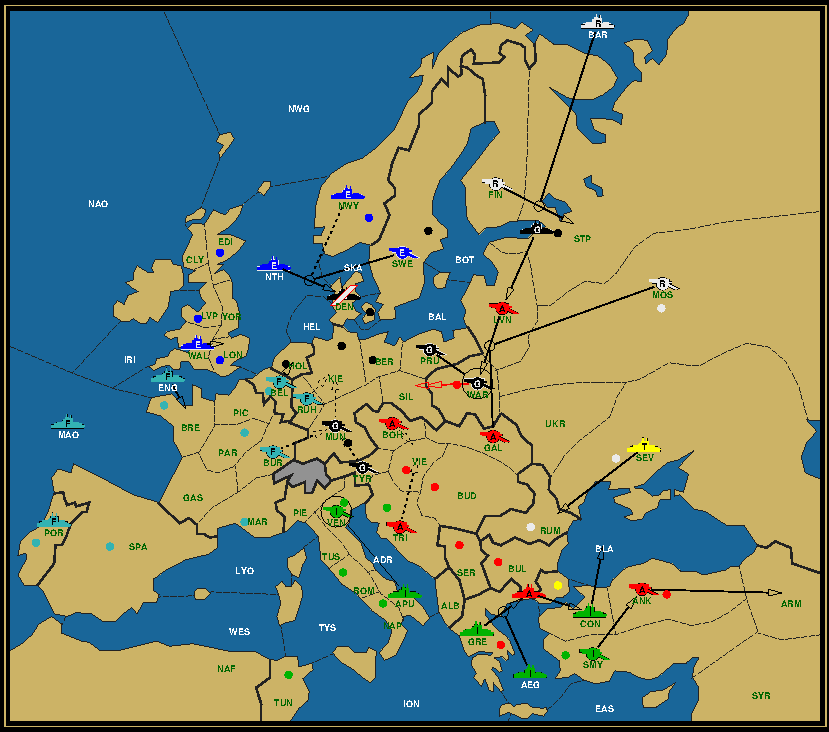
All powers could build. Only Belgium is still neutral. No real surprises with the builds, except perhaps the Russian army in St. Pete. How to build out from there?
Spring 1902

Comments

Millis Miller Actually I learned the value of A StP from people such as Yann Clouet : it's very flexible in where it can deploy, much more than a fleet is. Less likely to get England as wound up as F StP NC (and Germany with fleet on SC). Can also move South if things get fraught with Turkey.

Marvin Fried S1902
The season for me was focused on getting into position and figuring out whether everyone was going to do what they said they would do. Germany concerned me a bit with his insistence of keeping Burgundy empty, but it made sense if he was going to go after the north. I therefore agreed to bounces in Bel and Bur, if I remember correctly, and also agreed to the English bounce in Eng. Getting Por-Mat was the important bit, and it couldn’t be stopped. From there, I could swing south if Italy came after me (I didn’t think he would, and he didn’t), and I was in a good position to deal with whatever eventuality happened up north.
I was very pleased to see Germany move into Bal but also surprised to see the attack on Nth which was designed to cut Nth’s support for Nor and have Nor fall to Russia. My guess was that RG collaborated in a ‘you take Norway while I take Sweden’ kind of agreement, or else it wouldn’t make sense to put the fleet into Nor and leave Swe open. Regardless, Germany was now in an excellent position to take on either England with Russia’s help (and mine), or Russia itself and deal with England together. The options were there, and they were good ones. I was optimistic.
In the east I realized that Turkey was already on the defensive and losing Bul. Sadly there was nothing I could do to help him. It wasn’t clear to me why Russia was supporting Austria against Turkey when AI clearly had a good relationship (and Italy also clearly had peace with me in the west). Russia would almost inevitably be the odd man out. However I did not have enough time to really get further involved in the east, since most of my effort went to trying to get Germany to lay out his plans and work with me. He did not, however, choosing instead some kind of go-it-alone strategy, perhaps in the hopes of marginalizing me and taking most of the spoils. I don’t know if he wanted an RG against E and keep me out, or whether he would have been happy with an FGR against E like I wanted. He didn’t seem to want to commit to the latter, so I began thinking it was the former. I therefore became concerned that RG would roll west, and had to leave open the possibility of working with England if the need arose. I wasn’t getting strong alliance-type vibes from Germany (or any, really), and I was in no position to influence the east. I felt like there were things that I could do but again no one was giving anything away and no one wanted to commit. So I would just have to wait and see what would happen, which is what I hate doing. All the while in the east Russia was giving Bulgaria to Austria at apparently no charge because he was miles away from Ankara and out of position.
Eventually I had no choice but to use confidence and security building measures towards Germany to try to convince him to use his armies elsewhere, and figure out who he was targeting so that I could get on board. England seemed like the obvious choice, particularly since the German moved to tap North Sea, but there didn’t seem to be a willingness to work with me on that subject. Meanwhile England was under pressure and would become increasingly reliant upon me as a friend; and without a clear commitment from Germany I would entertain that friendship to keep my options open.

Mario Huys The fluctuating relationship between England and Germany at this point and hereafter is as fascinating as it's mysterious. I hope Nicolas Sahuguet and Ruben Sanchez are willing to share some insight here.

Nicolas Sahuguet1902: The build in STP was not ideal, but an army is manageable as long as Germany does not interfere, and it also gives some diplomatic weapons to explain an attack on Russia. If 2 of my units are occupied to defend NWY, I may as well send a 3rd unit to take STP because my other 2 units cannot do much elsewhere…
I did not get a very good read on Marvin in 1901 and our talk to start 1902 was not different. It was not clear what he wanted. He seemed to be playing a wait-and-see strategy but was negotiating like someone who wanted an alliance. The discrepancy between the strategic plan and the discussed moves was making me a bit nervous. But at least, I could count on my two friends Peter and Ruben.
I then go to talk to Peter to discuss how to keep the peace in Scandinavia and he tells me that Ruben is cutting NTH and that he is taking NWY. WTF … Peter tells me that it is more Ruben’s idea and he even mentions the possibility of misorder.
So I go to talk to Ruben about this friendly move. And to this day, it is still not clear to me what Ruben was thinking. He tells me that his move is the start of a big alliance between us to attack France. I retreat NWY to NWG, he would support a convoy to BEL in the fall and we attack France together.
And we are 4 minutes from the deadline.
Little survey: how many readers think that I should have been delighted with this proposal? Ruben still tells me that he does not understand why I got slightly upset. I retreated to SKA (of course…) and Ruben started talking to me as if I had stabbed him.
In any case, my position is in ruins in Spring 1902. Russia is in NWY with a fleet and is friend with Germany. I cannot hold NTH, I cannot defend ENG and IRI is vulnerable. I then entered a long period of hibernation where my moves are just a way to please my neighbours, and try to survive for as long as I can, buying my time and hoping that late in the game, I can use to my advantage the diplomatic card “you ruined my game in 1902, give me a chance to do something in this game now that you can’t win anymore…”.

Ruben Sanchez Just one minor missing point in the analysis of Nicolas… Yes Norway was taken –BUT– BEL was given as I supported England on BEL against the will of France.

Nicolas Sahuguet Ruben, it’s Spring 02. Right now, you have just cut NTH, given NWY to Russia and promised that you would support a convoy to BEL in the fall. From my point of view, right now, I have just been attacked by Russia and Germany with a vague promise of a center in the fall. Not a plan we discussed all together and that I accepted. You just imposed this on me. And from a strategic point of view, how am I supposed to attack France with 4 units and NTH under Russian pressure? In fact, spoiler alert, you will stop the attack on France almost immediately because there is little to be done there…

Ruben Sanchez Yes but the promise was done in F1902… No? With a support given to BEL against France's will.
But after F1902 you were still complaining. And you didn’t want to go at all against France saying your game was finished in F1902… But you still had 4 centers, no?
Ok let's go back to the start of the year.
After F1901 same diplomatic situation as at the start. Marvin objected leaving BUR DMZ, and there was still no intention from England to go after France. I was afraid from the beginning about the South. I saw GAL DMZ and Russia, Italy and Austria against Turkey. The future elimination of Conrad was very bad for me, and from the start I was afraid of the Italy/Austria alliance in particular.
I felt Marvin very reluctant and did not even anticipate France moving on Italy in the long term.
Nicolas did not gave me a single sign of moving on France so I wanted to get SWE and have a more secured Scandinavia. So yes, I arranged with Peter to take NWY and let me have SWE. I still wanted to have the option to work with Nicolas, so I told him the truth about the moves, offering BEL instead. Sure, I promised him BEL… but Nicolas was upset nonetheless.

Douglas Moore This season was the same for me — just getting into position. DMZ with France is good, communication is good with Chris Brand. Conrad Woodring is pushing for me to go into Austria, and depending on what I think Peter Yeargin will do, I'm strongly considering it. I'm being totally upfront on my thoughts in-game, and mostly being clear that I need a fifth dot if I'm going to do work with someone.

Conrad Woodring I basically spent all game trying to break up the three against me. Exhausting. At this point I thought Douglas Moore (Italy) could be talked into going for centers closer to home, and I didn't think Peter Yeargin (Russia) was completely committed to the attack. Even before Russia went to Armenia, I felt holding my position in Black Sea was going to be very important. Russia approached me about leaving black sea to fight the AI, but it was never going to happen. I saw Russia as basically having cut my legs out for a promise of Ankara. He wasn't going to get it.

Summer 1902

Fall 1902

Blurb Fall Map Comments Winter Map
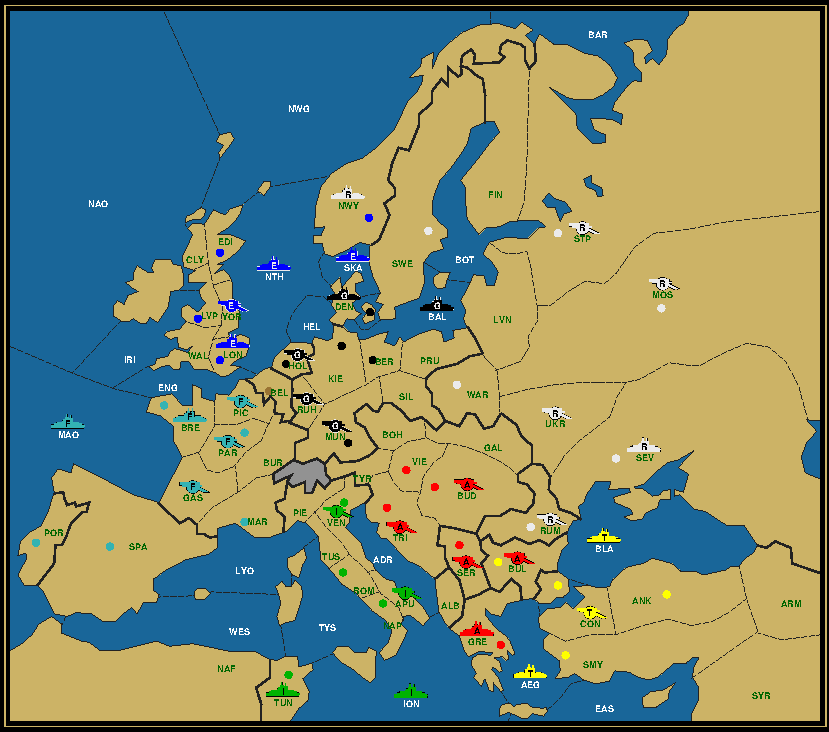
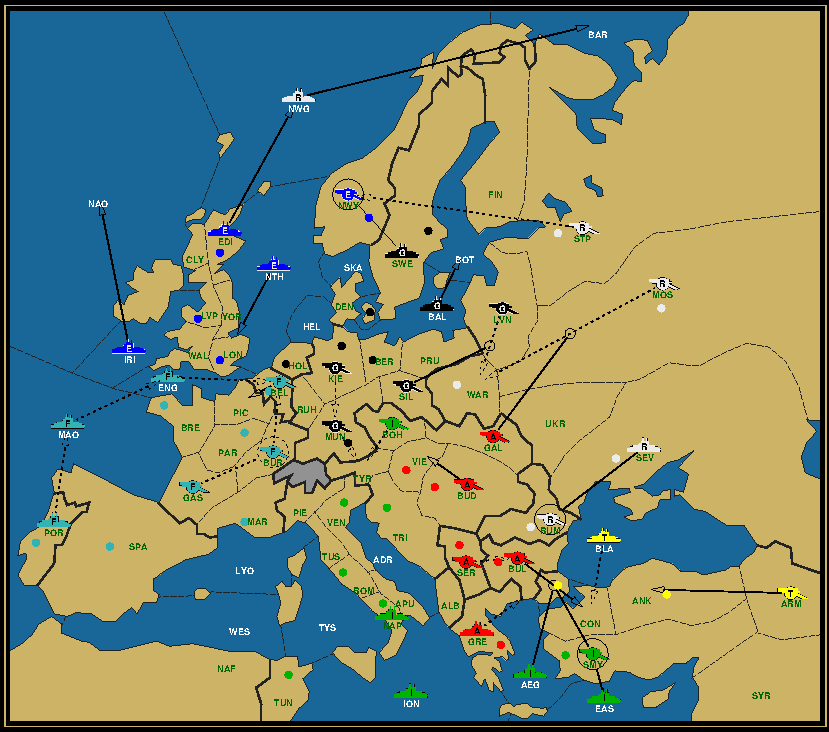
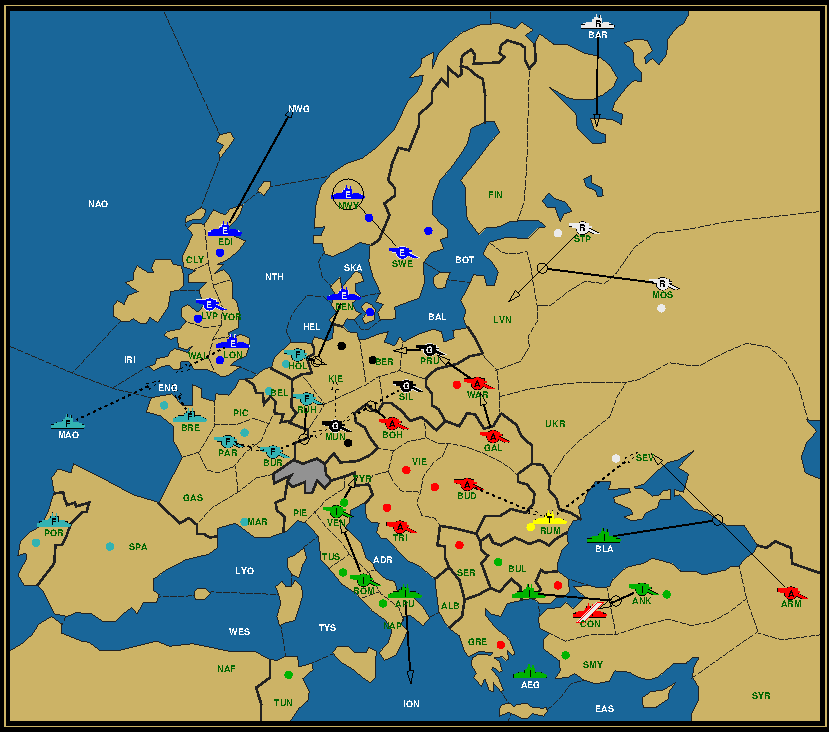
Italy is shopping around for a fifth center, England is bumped out of Norway on a questionable promise for support into Belgium. How do they distinguish between a genuine offer and a tantalizing mirage? Trust or revolt?
Fall 1902

Comments

Ruben Sanchez As I had the pressure from France on BUR, I did not follow up moving MUN-KIE to secure DEN in Fall 02.
France was focused having me moving on England, but there was no attack from France on England. So I did as promised. Give BEL to England, Peter having NWY and me SWE.

Mario Huys Nicolas Sahuguet, you just got bumped out of Norway thanks to Germany cutting your North Sea fleet's support, but Germany tells you to stay calm as he'll support you to Belgium. You're mad and confused. Assuming you knew that Germany's aim is to pick off Sweden, why not double-cross him by attacking Denmark? Why play second fiddle?
There's this notion that champions are better capable of averting a stab, either because their senses are more fine-tuned to certain warning signals, or they're simply more pragmatic in acting on those signals. From your point of view, this looks to be such a situation, because you can't know if Germany is telling you the truth about gifting you Belgium after selling you out on Norway. But still you did not counteract to punish the offender. Why?

Nicolas Sahuguet I figured that I could not win a war against Germany at that point and that it would give too many options to France to attack me in NAO or IRI. I had a bad start but I was not dead yet. So the important thing is to keep a position that you think you can defend. And at that point pleasing my neighbours (Russia and Germany) was a priority. Peter was telling me that he did not want to go further and Ruben was telling me similar things about Scandinavia.
So I decided that it was better to "trust" Ruben for now and see where it would lead us. The army in BEL is bad but it also keeps France honest. He cannot think of a convoy to the island. As long as he attacks me with fleets, I can deal with that. But if he convoys to WAL, I am done. That was my logic. The counterattack on DEN was a possibility. But if it fails because Russia cuts NTH or Ruben supports DEN, it is game over. By the way, I also played the move SKA-NWY which is missing. This is my way of trusting Ruben and Peter. Germany cannot get NTH and if Russia gets NTH, I keep NWY…

Mario Huys It's there alright, the dotted line between Ska and Nwy. A cut against Nth can be ignored if you convoy instead of move/support. But in that case your next targets are more likely to be Sweden/Norway than the German homeland, alienating Russia. And Lvp would of course be greatly exposed to a French stab. You'd be putting all your eggs in one basket.

Nicolas Sahuguet And finally "revenge is a dish best served cold". More on that later…

Mario Huys Excellent principle!

René van Rooijen If I were Sheldon, I would now post the proverb in Klingon. Fortunately, I am no Sheldon.

Mario Huys Let's turn to the other big gift of the season and ask the offermaker, Chris Brand: Why Tri? Why not Gre? Why now and not a year later? And did you ever play with the idea of reneging on that offer, perhaps with a Brand-style early game misorder?

Chris Brand My preference was to hand over Greece, but how would you do that? For Gre-Aeg to succeed, it needs a support from Ion…
I was feeling that if I didn't give Doug something then he'd likely move against me next turn, and Conrad would obviously be happy to ally with anyone who offered. Fighting the two of them wasn't attractive. So the only option was to offer Trieste.

Douglas Moore Chris Brand: This is how I saw it, too. I actually wanted Greece more than Trieste, but Chris's read on how I would react is right. If I was going to get shut out of Turkey — and the fleet remaining in Greece does that — why would I work against Turkey? Chris and I had a good rapport, and I made the request for a dot, and he did offer it. Had he reneged, I'd absolutely have worked with Conrad Woodring against him. Believe it or not, holding Trieste as I did made my alliance with Chris MUCH more stable over the coming seasons. Dotting him was futile, because he could take Trieste back at any point. It earned my friendship, an active alliance partner, *and* kept me honest. It was a good move by Chris (in my opinion).

Marvin Fried F1902
By Fall 02 I was growing increasingly concerned about the swift collapse of Turkey and Italy’s capture of Trieste meant Italy was growing very powerful indeed. The Russian move against Turkey in Armenia worried me too, as the IA was so strong that he would surely be the odd man out. I spoke to Turkey, but short of attacking Italy I wasn’t really in a position to do anything about it. I had my own problems up north.
Despite the moves, from what I recall the English capture of Belgium was by agreement with Germany. I said I would be fine with the English in Belgium to compensate them for Norway; it would keep England in the game and hopefully positioned against RG. By this point I really thought England would come firmly to my side but his EOG for this season demonstrates his continued very strong fear of me. I did take Eng in force, but this too was by agreement. Pretty much everything I did between here and the attack on Germany and later England was by agreement, because I couldn’t get anywhere with trying to draw one or the other to my side.
This is probably where knowing your opponents before the game makes a big difference. Whereas in other parts of the tournament experienced players would recognize another experienced player and be willing to go on some faith to do interesting things, by the end it seems everyone just wanted to stay away from me and keep me at arm’s length. I was genuinely surprised that Germany, who had just stabbed England in Norway, didn’t want to work more closely with me to take out the English now that he had been made a target. I was also surprised that England, who had just been stabbed and who had been lied to by two of his three neighbors, was still so afraid of me and didn’t want to work more closely with me, the only player who had not attacked him. This was very frustrating, mainly because I ended up guessing wrong. For the ensuing moves I toyed with the idea of unilaterally joining RG and taking down England, but not feeling the love from Germany I didn’t want to alienate England as well and risk Italy jumping on board if EG joined forces against me. I therefore gambled on helping England survive, grow where possible, and have him work with me against RG rather than against me. But I didn’t feel like England felt very much gratitude at all for my role in his survival, which contrary to the moves of this turn was in fact considerable behind the scenes.
Elsewhere the builds of A Kie reinforced my belief that Germany did not seek a protracted war with England and that his main concern was me. And the Italian naval build in Nap, while better than Rom, was also not the best thing in the world for me. But it was the logical build and discussions with Italy went well so I was not concerned for my safety.
But it was not all bad news — my defensive posture was solid both on land and at sea. I achieved my goal in the first two years of not going down first despite two clearly very distrusting neighbors out of the three. I hoped Turkey would be able to hold on longer and I was wondering who the next power would be to go down. There was a large concentration of forces around Belgium now, and it is the knowledge of this which required me to militarize Burgundy, again in agreement with Germany though he was no doubt unhappy about it. Still, the hexagon was protected. I would have to wait and see who would be coming for me, or what would open up. I intended to deter G (and a potential E ally of his) through my posture, but that meant I had no option but to push England towards Russian Scandinavia — not something I was too keen to do as Russia’s southern position was fairly weak despite most of his forces deployed there. I was very concerned that AI would roll the board in the east just as Chris and I had a few boards earlier with the Key Lepanto. In that game, too, Turkey was quickly destroyed and AI turned on Russia. 1903 would bring either movement or stagnation, though my diplomacy would continue unabated and at pace.

Douglas Moore Rom/Nap are the same vs. France. The most dangerous position for an Italian attack against you was at the start of this season, moving Ven-Pie, and Tun-Wes. I do like going west as France, because as Italy, you MUST defeat one of France or Turkey, and if you can breakout in the west… well, it's a lot of fun. With our DMZ in place, though, I was free to focus on Conrad Woodring, both militarily and diplomatically. And, for what it is worth, I never really received a push from either Ruben Sanchez or Nicolas Sahuguet to go west. I did have Chris Brand and Peter Yeargin both asking me to focus on Turkey.
And, to be frank, my diplomacy was successful in that I had offers for a fifth dot in the east. With that happening, there was no reason to do anything but what I did.

Chris Brand I would have been very happy to see Italy go west, although I may not have expressed that properly. I don't think Doug brought it up, likely because there wasn't a pull from E or G.

Conrad Woodring This was the move where I started getting annoyed at Russia. He was committing a lot of forces south for no gain against me, while fighting a weak fight up north. My negotiations were not going well and I was pitching ideas and offers to everyone.

Winter 1902

Spring 1903

Blurb Spring Map Comments Summer Map
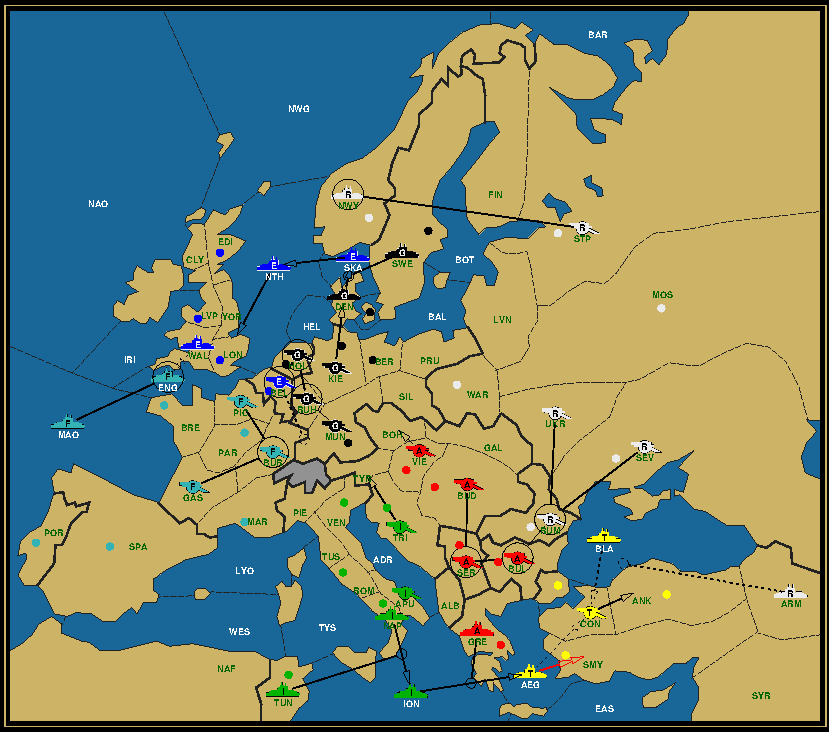
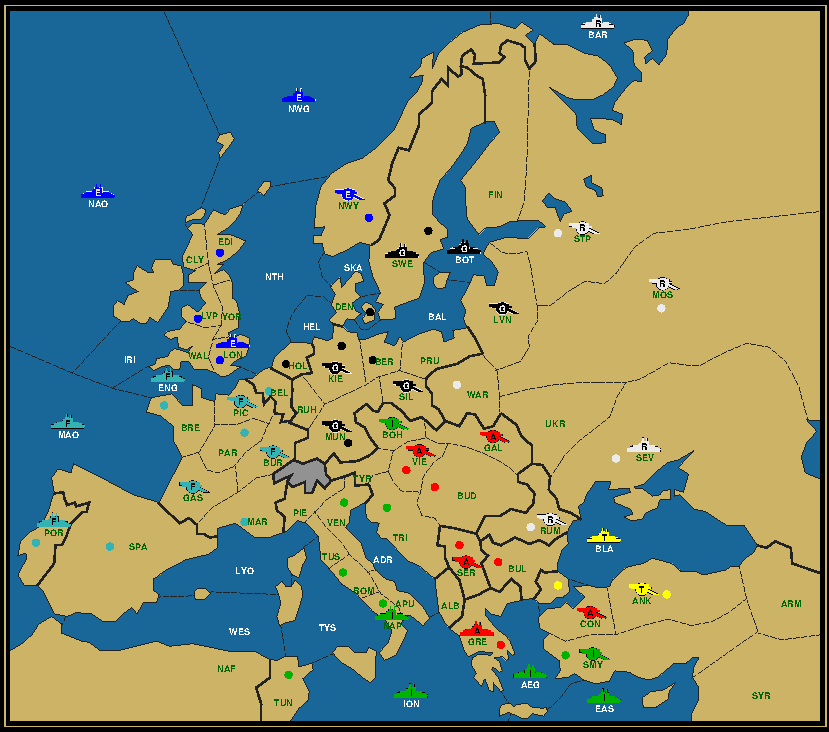
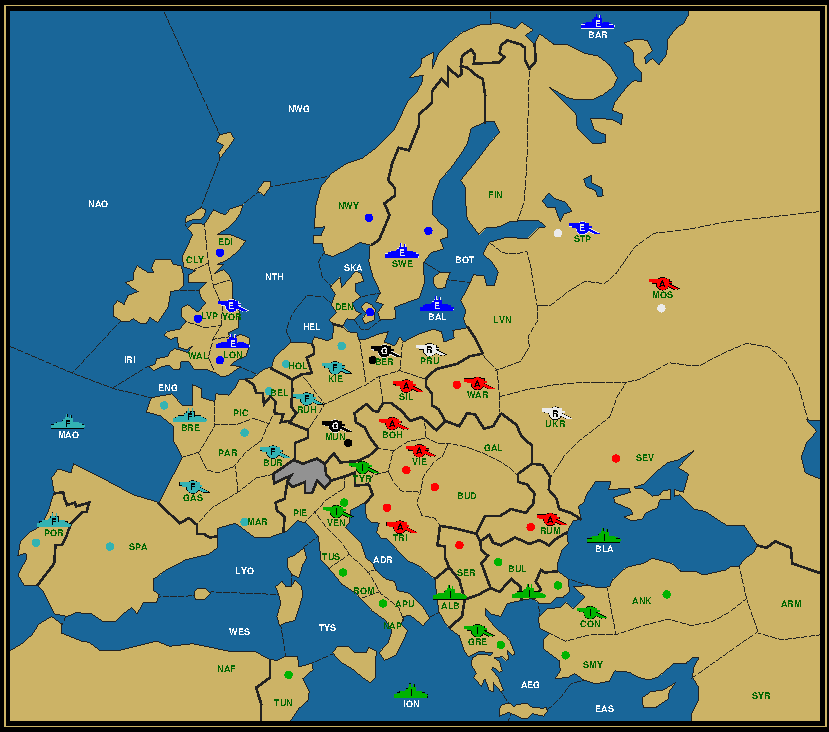
We're reaching a first point of stagnation, with lots of defensive moves (or rather holds) across the board. But as each Diplomacy game needs a dynamic, a will to go on the offensive, I'd like to ask each player what they see at this point as their next target, their likely next dot.
Spring 1903

Comments

Ruben Sanchez 1903. Well, it was a disaster in the South. Conrad was resisting alone. Marvin was not even considering at one stage to do Balance Of Power by sending a fleet South. And then I took a very bad decision.
I had a very good alliance with Peter at least for peace but I did not share his mid-term vision of the game. Peter wanted me working with England (so not with France), while he was killing Turkey and I had no clear vision at all about what would have been his target thereafter. I am taking the blame on me first because I did not spend enough time with him, having been too involved in discussions with France and England.
I had 2 options. Finishing England or moving on Russia hoping to save Turkey. France was not an option. I have been then too ambitious moving on Russia as England apparently was following and I wanted at one stage to move into TYR to push Marvin to move to PIE. I also do not remember in which turn I received a very serious warning from Doug and Chris moving into TYR and BOH.

Nicolas Sahuguet For me, a simple season. I needed to please Ruben so i did what he wanted. I was feeling that he was pointing a gun to my head but I still supported him into BUR (with no chance that the move would work) and moved SKA away. At that point, with France playing a waiting game, I was back in a decent defensive position. I even had 3 fleets vs 2 against France. So with some patience, Ruben and I would be able to crack France's defenses (the plan he had been selling me to justify his previous actions). However, with heavy pressure on NTH and nothing serious from his part, I was just happy to wait things out. His moves to SKA and DEN were not inspiring especially with Italy moving to TYR and Austria to BOH. And what was he doing moving his units against Peter, his ally? Lots of questions, but not really my problem. The Lepanto was developing fast, but once again not really my problem. A funny anecdote: Marvin tells me that he plays MAO Support ENG and I tell him that I play WAL-ENG. And then he tells me that I don't trust him. And I tell him that I trust him . But that this was an insurance. If I am right to trust him, nothing happens, but if I am wrong… He looked at me like if I was from another planet. Communication issues there!

Mario Huys It's the same kind of move as Ska to Nwy the previous season. It keeps your adversary honest, because if they don't do as promised, they don't gain much. Without Ska to Nwy, Russia could have moved out to Nwg and taken Nwy with the army. But because Ska blocks the army, the end result would have been a build for England. Likewise without Wal to Eng, France could have moved to Nao and Iri without a worry for Eng, or support Nwy to Nth. It's not so much you trusting them as you keeping them honest.
Of course communicating your intended move is a form of trust, because there could be other ways to exploit that. Mao to Nao, Eng to Mao would lure Wal into Eng, exposing Lvp without any hope for taking Bre or getting into Mao. Had either of you considered that?

Douglas Moore Most important development here is that, to my mind at least, AI starts really working very well together toward concrete ends. Chris Brand and I have strong plans, don't need to waste a ton of time persuading each other, and are sharpening our tactics and tempo. We are setting the stage for Con/Smy while still figuring out the split of dots. We moved to Tyr/Boh for a couple of reasons: 1. to clear some space; and, 2. To mess with whatever is happening in the West. It looked a lot like Ruben Sanchez and Marvin Fried were going to take down Nicolas Sahuguet, perhaps with Peter Yeargin's help. And I wanted to slow that down and add uncertainty to that process, and solidify things with Chris. For Conrad Woodring, he's in a terrible spot, with all three of us attacking him. I want to give credit here, though, because Conrad never gave up and was pro-active in coming to me with plans and ideas. Because of his tenaciousness, I was probably telling him more than I should have, but he's a great player and I respect that quality in him. I saw no reason to lie to him about what I was going to do, either. 3v1 doesn't need that, particularly when it is manifestly obvious what you will do (Ion-Aeg).

Chris Brand Yeah, completely agree regarding Conrad's play.

Mario Huys It's interesting to see Ruben Sanchez mention a similar plan, he moving to Tyr in hopes of having Marvin Fried go to Pie, with the aim of taking the pressure off Turkey. Influencing the corner by pushing through the center. Smart.

Peter Yeargin This is the season prior to the pivotal one in the West. Next season is when things really turn into a bit of a disaster, allowing the AI to really pick up major tempo gains. To my mind, Marvin Fried has gotten a solid position defensively, but doesn't completely trust that Ruben Sanchez is on board to finish off England. Ruben was extremely concerned about the English fleet in Ska and used his units to knock it out, with my blessing. My assumption was the next move was for Germany to get supported into North Sea with my own follow ups to Norwegian and Norway behind. A crushing blow and one that finishes off Nicolas Sahuguet. Unfortunately, it didn't go this way next season. The play turns extremely conservative in the West and the stage is set for AI, and ultimately Doug.

Nicolas Sahuguet Interesting to hear from Peter that Ruben was clearly thinking about attacking me despite all he was saying and keeps saying to this day. The retreat to SKA was clearly my salvation slowing down Ruben and putting him in a position with fleets in SKA and SWE to change his mind and attack the closest centers rather than mine. I knew that Ruben has some "Me see, me grab" tendencies that he is fighting against, but sometimes unsuccessfully.

Marvin Fried Interesting revelation indeed from Russia. If Germany was colluding with Russia to take out England, it would have made sense to involve France as well. Perhaps it was a one turn consideration which died with the English retreat choice. I certainly didn't get much engagement from Germany on an anti English course.

Peter Yeargin I wish you would have told me about those tendencies, Nicolas. :) I would have played it differently!
As it were, both Marvin and Ruben told me they were going your direction in 1901 and I felt like there wasn't much of a decision on my part if I wanted to keep a strong tempo going with AI.
Ruben and I put an agreement in place from the start to give me Sweden and then a support through to Norway while giving him Sweden behind me. If the plan was an attack on me, it's impossible for me to have anticipated it. It's also possible Ruben was attempting to go as long as possible without upsetting anyone or lying. My negotiations with him were very much borne out of an FG alliance with me helping until after this turn.
Ruben also cut North Sea for me in Spring of 1902. Hard not to see all of those moves as a killing blow of England.

Ruben Sanchez Words are important… Killing is when you kill someone, not when you are taking one center of him. At the end apart from the swap NWY/SWE, where are the moves against England?

Conrad Woodring This is the sort of game where it doesn't matter what you think you mean or you think you are saying. It only matters what the others think you mean.

Summer 1903

Fall 1903

Blurb Fall Map Comments Winter Map
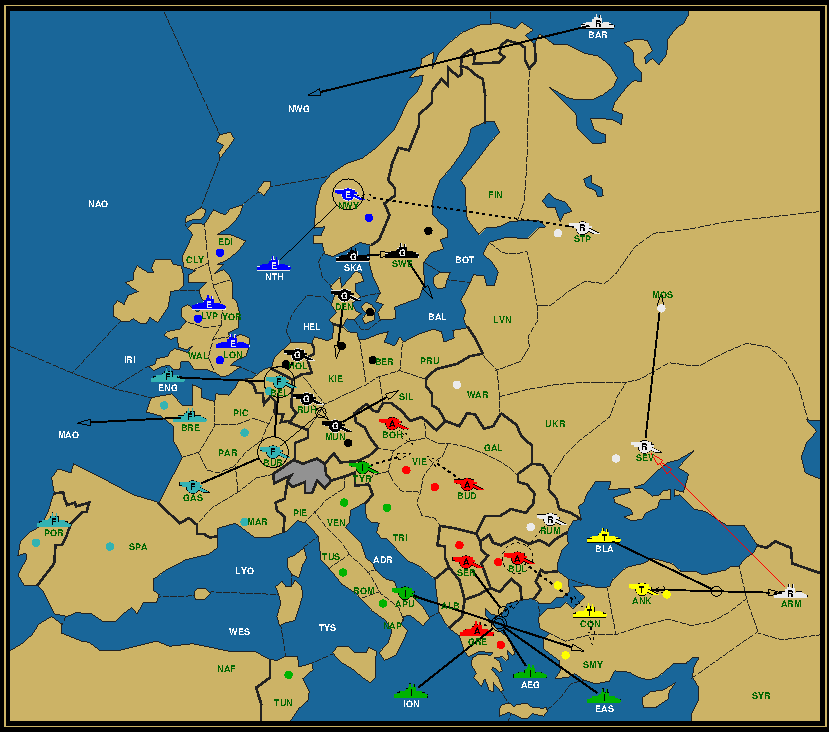
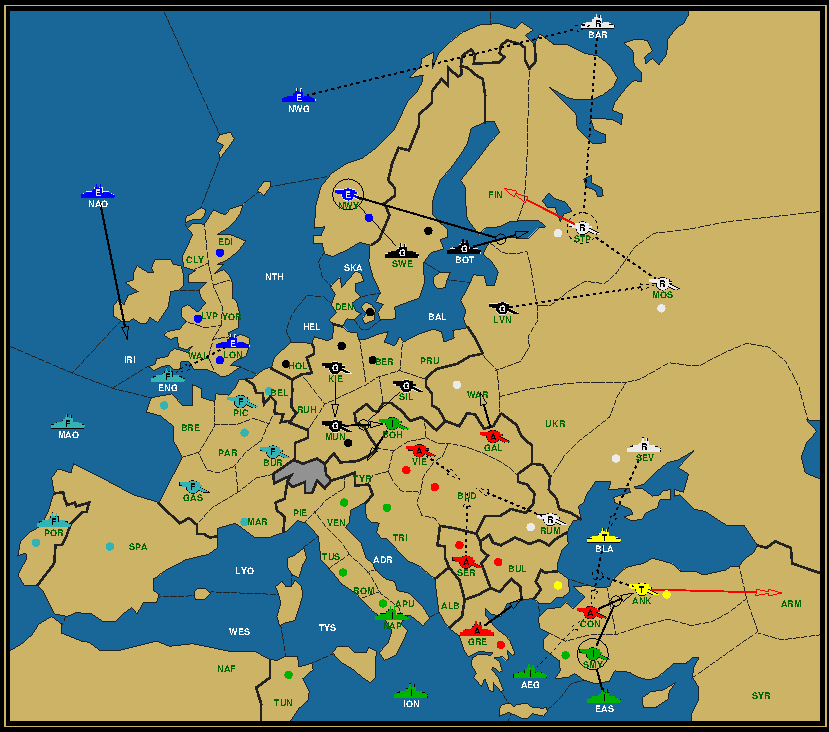
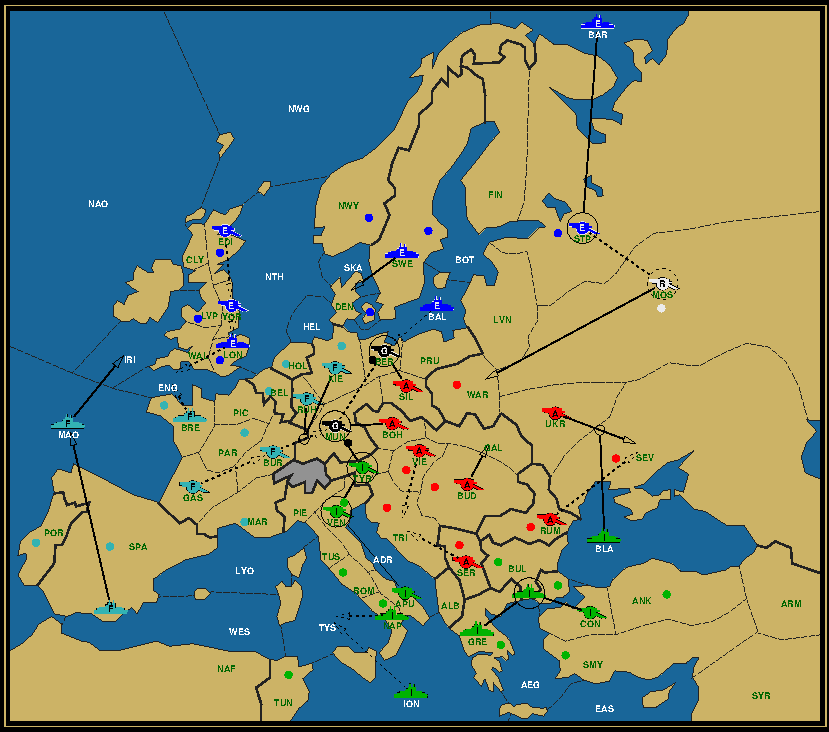
In order to relieve some pressure off Turkey, Germany hatches a plan that hurts Russia and benefits France. But France doesn't really play ball. Was this Western Triple doomed from the start?
Fall 1903

Comments

Larry Peery Reconstructing a top board game after it is over is almost impossible.
I've tried it so many times in so many different ways and there's always one screw-up who doesn't want to cooperate. I finally figured it out by process of elimination that it was because they had cheated during the game and were trying to hide it. I once wrote an article on that topic but it was so explosive even I wouldn't publish it.
Anyway, my questions are: 1) Have you ever climbed Mt. Fuji? 2) What do Fuji apples cost in Japan?
A photo of you standing in front of a Mt. Fuji poster (or the real thing) eating a Fuji apple would make a nice illustration for my current project :-) Or maybe a family shot with you all munching on one would be even better.

Mario Huys I think we're going at a good clip, so maybe you're just jealous? 🙂
Answers: 1) To the top? No. The weather has not been cooperative so far. 2) About 200 yen or 2 US$. 3) There are no Fuji apples growing on Mt. Fuji. They were first cultivated in Fujisaki in Aomori prefecture, the most northern prefecture of Honshu, the main island. Hence the name. That place is as far away from the mountain as you can get without dropping into the sea. 4) No. Now can we get back on topic?

Nicolas Sahuguet Another season doing Ruben's bidding. I was prepared to discuss how to get into ENG preparing moving against France. I thought he would tell me to take ENG with NTH while he was moving there. But surprisingly, Ruben tells me that he is supporting France to BEL and that he can support me to NWY as compensation. Spring 1902 all over again. This is really bad for me. France with 6 centers and 3 fleets is just too solid. Ruben argues that France needs a build to go against Italy, but he is basically giving France the keys of the West. France now cannot be attacked unless he sends units against Italy… But, what else could I do but accept? It is better to stay at 4 units than 3, and NWY is a better center than BEL. However, this is very bad strategically. France will now completely dominate me and I will have to say yes to all his wishes. In any case, I get back NWY from Russia and I already have my revenge on one of my 1902 attackers. A bit too early, but I could not really pass on the opportunity. And Peter cannot be too upset with me — Ruben will get most of the blame. In any case, it is 1903, Ruben has stabbed two of his neighbours, Austria and Italy are laying siege to MUN, France is not really a friend. And I am not even sure that Conrad will be there much longer to thank Ruben for his balance of power strategy. To summarize, after 3 years, Ruben has already ruined Russia and England's game and his position is far from good. I think the pressure got to him.

Chris Brand Hardly laying siege to MUN — Doug supported it and I self-bounced in VIE :-) Of course sieges are a waiting game…

Conrad Woodring Diplomacy was getting desperate here. Not getting traction with anyone. Was very annoyed with Peter Yeargin (Russia) for disbanding Ukr instead of Arm. He was direct with me, he had been promised Ankara and he was going to get it. I resolved he wouldn't. Was lucky to finish this year on three. It's hard to remember, but it's about this time that I started having nice chats with Nicolas and Marvin. I think this was also the move that Douglas Moore had to pee really bad and ran off during the diplomacy phase while I was talking to him.

Mario Huys Marvin Fried, you chose to move your Mao fleet to Por, whereas Spa/sc would be the more versatile move (and Wes the most aggressive). In fact, you've effectively increased the distance to Italy, because none of your fleets are bordering Wes anymore. Coupled with a F Bre build that tells that you're not about to leave Eng soon, you've made your stance pretty clear. Don't you believe a more flexible approach that keeps all your neighbors on edge (between hope and fear) would have served you better?

Marvin Fried Yes, the move to Por did limit my options in the south. It set me up purely defensively but, if Belgium yielded another dot it would be a fleet and take Mao's place. The DMZ with Italy was something I needed and agreed to expand. Keeping Spa/sc open ensured that Italy would feel comfortable emptying Tunis and creating an even wider demilitarized zone. I could still get the jump on him from Mao if the situation required it, while Por ensured that my defense was also given. I was still unsure about the north and needed certainty in the south. The Por move and corresponding Italian positioning ensured that. And based on what I am now hearing, it seems that England was still closer to Germany than to me, so my caution was the right call. If I had engaged south, I feel EG would have come after me and invited Italy to join at his leisure. Like this I could establish a strong deterrence with three fleets and three armies, and work to get someone in the north on my side.
I can't remember the precise circumstances under which I was able to obtain Belgium. I think it was Germany who came up with the plan to exchange Norway for Belgium, but I didn't really comprehend the reasoning. Why ally with Russia against England and then switch sides a year later? And why do this when the ultimate beneficiary would be France? I didn't get it, but kept insisting that compensations must be given if EG go after Russia. I wasn't opposed to EG going north, but wanted to make sure I got something out of it. Belgium was that something, but it seemed Germany had already decided to give it to me even before I had to insist. And this despite Germany being apparently annoyed at my need to protect Burgundy. I figured at worst Germany shows his hand and England and Russia will ask for me to join them against him, or at best I get a Belgian freebie. Both good options. England was still hesitant towards me despite me pointing out that I had done nothing to deserve the suspicion he should have reserved for Russia and Germany. If revenge was what England was after, he didn't seem to want my help in doing do. And Germany was playing some kind of game I didn't understand and he didn't really explain to me. I was very keen, still, to try to work with Germany, and the presence of southern armies next to Munich worried me. I thought IA were trying to cross the stalemate line early.

Winter 1903

Spring 1904

Blurb Spring Map Comments Summer Map
Italy manages to pull off a convoy to Turkey and straight into a center, while tussling with Austria over Vienna. This allows Germany to direct his phalanx towards Russia. How much of this is staged, how much is genuine? Does weakening Russia play into AI's hand?
Spring 1904

Comments

Conrad Woodring Not sure. This is the point where lunch with Maletsky was looking to be much more interesting than this game. Italy was showing no signs of splitting with Austria, and I am no longer useful to keep alive to fight Russia once another fleet gets into the Black Sea.
Shortly after this I was irrelevant.

Mario Huys Without the Russian fleet in Arm your defense options would have improved, although Italy could still land the army in Syr. Do you remember if Austria tapped Con this turn to guarantee the convoy to Smy going through?

Conrad Woodring Mario Huys likely yes. They were extremely careful with how they moved to guarantee everything. I was massively out numbered so no need to for them to be creative.
Even with Russia out of Arm he still wasn't interested in anything I had to say and thought he'd get Ankara.

Mario Huys Map updated accordingly.

Nicolas Sahuguet Not much happening. I have to control France as much as I can, so I keep 2 fleets in defense. Not much happening on the other side but the DMZ of RUH shows that France and Germany are not fighting. And no sign of France trying to control Italy's expansion. To make matters worse, Peter moves to NWG. I am still far from a position where I can think of doing something. So I wait. At that point, I was just trying to save energy (not talking too much), trying to survive a few more seasons hoping for some opening in the future. I knew that it would come, but the situation in the East on which I had absolutely no control was not making me optimistic. And I was getting stressed waiting for orders to be read hoping that France had not moved against me.

Mario Huys You could have moved to Cly to counter the Russian fleet move. Do you think keeping a fleet next to Iri is a better deterrent to France?

Summer 1904

Fall 1904

Blurb Fall Map Comments Winter Map
Russia's switch-and-reverse tactics in the Norwegian forces England and Germany to improvise, drawing praise from the latter, who nevertheless goes full bore against him. Meanwhile Turkey denies Austria a center for which Italy would have liked to claim a second build. Is the attack on Greece a sign of greed or a clever way to protect Trieste?
Fall 1904

Comments

Marvin Fried I'll take 1904 together. I worked hard to get Germany to start pushing units east and protect what I took in Belgium. Although Germany did move to Silesia, he brought Denmark back to Kie so my overall position was not much better until the winter of 1904. The Russian move to Nwg helped in the sense that England had to put more attention on the north (and away from me) than he seemed willing to do so far. I was positioning to be able to move where necessary, in an almost ideal formation. I say almost because F Spa/Sc would have been a better choice for Por but I couldn’t do that until I was sure things in the north would be sorted out. And I didn’t feel comfortable at all that things would get sorted out.
Germany did, finally, take a stand in the east this fall. He emptied Hol, protected Norway, and moved on Lvn and War. If I remember correctly this move came as a surprise to me because Germany did not tell me he intended to start working with me and/or trusting me. I told him I would defend Munich from AI but that we would have to start putting units into Boh/Tyr if we wanted to get on the front foot against AI. I guess Russia was a better option than AI for G, but all this did was strengthen AI as Russia would inevitably collapse as a southern power under this onslaught. But because I could do little else I had to go along with it.
Should I at this point have engaged south? Probably, but then I would be alone in resisting AI while Germany and England get all of Russia and I am isolated and at their mercy. That was not a position I wanted to be. I do not believe in the effectiveness of a French southern invasion with both G&E still alive, so given these considerations my military options were limited and, again, and against my own wishes, had to play for time.
I felt like I had no good diplomatic options left either. My efforts at organizing a RGF resistance to AI would come to nothing thanks to the intervention of G against R. I therefore was forced into a western triple I didn’t trust or want, and subsequently spent most of my time establishing demilitarized regions (starting with Ruh) between myself and my two northern neighbors, in order to either go after Italy when I really had no choice anymore OR going after one of them when the time was right.
Overall my strategic position was poor, even if my military defensiveness was strong. I thought IA would eventually break and one of them, most likely Italy, would come out on top. But I just didn’t have the bandwidth to stop it myself, or even alongside Germany if England let us, because the eastern powers who could have done something were both dying, either at the hands of AI or GE. I was along not because I was being attacked, but because everyone was looking for gains of their own without really worrying about the balance of the board. Not a great place to be.

Winter 1904

Spring 1905

Blurb Spring Map Comments Summer Map
While France perfects the art of non-engagement, Austria comes to the rescue of Russia and Italy blocks a German attempt to enter Tyrolia. Switch-and-reverse successfully blocks the German advance for now. But for how much longer?
Spring 1905

Comments

Mario Huys Chris Brand, you can spill the beans now. Were you already eyeing those juicy Russian centers or were you really trying to help him here?

Chris Brand I don't remember for sure, but my move of Bud-Vie seems to indicate that I was more worried about Italy. There are so many considerations in a game like this: Is Turkey dead enough ? How would Russia react to a stab ? What happens in the north if I attack Russia ? Where's Italy's next dot ? Most of this game I was trying to do two things — (1) avoid being attacked by Doug and (2) keep my options for growth open. This is still pretty early in the game, so I didn't feel that I needed to be particularly big, just big enough to be viable.

Douglas Moore I think we talked about Bud-Vie, Russia, and what to do there… it's faded over time. But, I think we both wanted that there to ensure safety, help protect Tyr, and we also agreed it wasn't quite time to wipe out Peter.

Summer 1905

Fall 1905

Blurb Fall Map Comments Winter Map
While the rest of the board tugs and pulls to get to the Russian and Turkish centers, France completely forgets to turn in any orders. Did he think it was time for a toilet break? Marvin Fried, tell us what happened.
Fall 1905

Comments

Marvin Fried 1905
This was the year (in the fall) when I held all units, entering a blank order sheet. No, it wasn’t a toilet break. It was an intentional decision (hence the empty order sheet) but one which betrays a sense of frustration and the lack of any viable alternatives. Unable to get either England or Germany on side for a real alliance which would work against the third I had to resign myself to improving my strategic overall position, and this meant working with both and establishing demilitarized zones to give myself space. Even achieving this was very difficult, as both neighbors would not give in an inch, and rightfully so.
In the spring I had engineered a self-bounce in Bel and a retreat to Picardy to show my willingness to work with GE. England insisted on tapping Eng to ensure I was trustworthy, and I had retreated from Bel to show my own willingness to work with them. All this was designed to get EG to look east and, possibly more importantly, for Germany to look southeast at the AI. Turkey was clearly on his way out, and with EG unable to resist the lure of the northern centers, it was up to Germany to send forces east to deal with the impending AI dominance. I needed to see real German engagement there first before willing to consider a move into the Med myself.
In the Western Triple, which was unfortunately what was forming organically, I traditionally view France as having the worst set of cards. England obviously fares best, and Germany can do quite well. Therefore, if I was going to be pushed to go to the Med to stop AI there, it required Germany and England to show that they would be willing to commit to the plan as well, as well as give necessary, even if painful, compensations (such as Holland). Germany had started the process by protecting Silesia and landing in Lvn — his attacks in Tyr and Boh put him in the right space. This is what I wanted, and indeed needed. The change in plan in 1906 had to do with the plan spectacularly falling apart.

Mario Huys A bold decision nonetheless. I wonder if this is a first for a WDC top board game to see one of the main contenders turn in a blank sheet on purpose.

Ruben Sanchez The attack on Russia was a failure, for 2 reasons:
1. Peter defended brillantly, I was really impressed. His tactical moves were all really excellent.
2. Again I made another mistake because Nicolas wanted STP. I was ok, but then I realised Nicolas could lose NWG. So I refused to support his NWY, which was the turn before the stab. If I had accepted giving STP to Nicolas, he would not have been in position to stab me, or at least not that turn.

Winter 1905

Spring 1906

Blurb Spring Map Comments Summer Map
We're right at the halfway point, when England and France (with Russian assistance) stab Germany. It's a cruelly efficient stab, as Germany is bound to lose even more centers in Fall.
Nicolas Sahuguet, this is your "moment de gloire". Tell us all about it.
Spring 1906

Comments

Nicolas Sahuguet I have been groveling my way out of misery for a while now, following Ruben's orders and trying to please Marvin. Little by little, I improved my position and managed to get Peter's fleet away from my centers. In fall 1905, I was expecting Ruben to support me into STP. Basically, Peter had told me his orders and I knew that STP would fall to an attack by NWY. Even if it was technically a guessing game (Peter could have played BAR-NWY). Ruben was not listening to me and basically ordered me to support the attack from BOT which was 100% but that gave him the center and kept me at 4. After years of doing nothing, I was a bit annoyed that he would not consider things from my point of view. Then in the spring, Marvin tells me that he is moving to RUH and BEL to take HOL in the fall and Peter tells me that he talked to Marvin and would support me into SWE with FIN. Given what Ruben was telling me about his moves, this would give me a shot at DEN in the fall. I would move to 6 and would be able to build 2 and at last get my island well protected. So I went for it. And it worked. I am back in the game. Patience paid off. Revenge is a dish better served cold, and it is cold in SWE and DEN.

Mario Huys Let's take a look at the ownership table at this halfway junction. We see that Germany and Austria are in the lead with 7 centers, followed by Italy and France at 6; England has 4, Russia 3, Turkey 1. Austria has 1 build pending, if he's able to keep what he has. Douglas Moore, how did you evaluate your own chances at this point? Who did you see as your biggest rivals? And how did this change after the successful stab on Germany?

Douglas Moore I thought I was in a really strong position with really no one challenging me directly at this point. The game clock, if you will, was running down and the distance between a potential opponent in France was still pretty distant. Conrad Woodring is effectively out at this point, which means my Med. position is very strong against Marvin Fried and I'm behind Chris Brand in Austria. Looking at the position, I thought that one of Chris or me would probably top the Board.

Conrad Woodring I may have already been having margaritas with Maletsky at this point. Or shortly thereafter.

Marvin Fried S1906
Now I don’t remember exactly what happened, but the risk of a powerful German started to become very great. I remember becoming increasingly frustrated at the lack of progress in negotiations. I had to deal with significant intransigence throughout most of the game and thought, eventually, that I had had enough. (It seems like England felt the same, plus I knew he still wanted revenge.) EG were the only ones benefitting from their attacks in the north, and when I asked for compensation in Holland in exchange for putting units south I was immediately rebuffed. This was not really acceptable for me.
I therefore decided to take the leap and stab for the first time in this game, thinking that if I did not do it now, while my defensive position in the south was still strong, I wouldn’t get to where I needed to be to have a chance at the win. I honestly didn’t think I really had a chance anyway, but I pushed myself to go for it. And with England’s game being ruined by Germany early on, I thought he would be right on board with me, hence I disclosed my plans to England, who made corresponding plans up north.
While not a great stab by any stretch of the imagination, I realized that without a firm alliance like AI had, the DMZ wouldn’t give me what I needed to grow. I therefore had to make a choice, and while my choice as France would usually be to attack England, I thought Germany’s position in the east and England’s gratitude for being kept in the game might be enough for me to take advantage of a stab and collapse Germany quickly. This did not happen because of Germany’s defense and the other side recognizing the benefit of keeping Germany out of French hands, but looking back it was an acceptable decision. England’s posturing meant that a stab against him would have been very difficult and unlikely to succeed even with the limited type of gains I achieved in Germany. At the very least I was again doing *something*.

Ruben Sanchez The turn that I got stabbed was due to a combination of 3 factors:
1. My refusal of STP for England
2. The fact that Marvin wanted another center, or I would say another of my centers: HOL (after he already got BEL). For me this claim was missing the main point of the situation. For France at this stage to get a center the 2 options were moving on England or Italy, because the victory was going to one in the Austria/Italy alliance.
3. My inconsiderate reaction to the claims of England (on STP) and France. I should have explained better the threat from the South and should have ceded STP.
I was stabbed, resulting in the loss of SWE and then DEN in fall, France taking HOL and KIE.
I took TYR, but as I had a combined stab from England and France the game was over for me.

Summer 1906

Fall 1906

Blurb Fall Map Comments Winter Map
Attacked from all sides the German Reich crumbles, losing 4 centers in just one turn. Meanwhile Italy and Austria exchange centers as if they're on a switchboard in a train simulator game. With Germany dropping out of the race, it's still wide open with 3 powers having 7 centers and England at 6. Where will this go from here?
Fall 1906

Comments

Mario Huys Marvin Fried, with Tunis virtually wide open, this (or maybe the next) turn represented perhaps the best opportunity to launch a campaign into the Med and establish a new battle line centered on Western Med and Tunis. Did this not appeal to you?

Marvin Fried F1906
A 50/50 guess went the wrong way for me here which led to Germany’s stronger survival than I had anticipated. I took Holland unopposed but tried for Kie instead of Munich, thinking Munich would be supported by Tyr (with AI allowing it) or Austria in Boh supporting Mun. I drew this conclusion because neither Italy (with Ven-Tyr) nor Austria (with Boh S Bur-Mun) were willing to work with me to actively destroy Germany.
This was likely the right decision, but I was surprised Austria was interested in keeping me at bay in Germany instead of giving me Munich and getting me involved in the Med to take the Italian pressure off him. Italy was in the Black Sea and although Austria received Trieste back, Italy’s strategic position was still much stronger than Austria’s. It was strange to me, given the obvious unholy alliance (FI), that Austria did not try to give away what was not his anyway in Germany in order to shift things in his favor and get me involved against Italy (at least as a counterweight, even if not as an outright adversary).
Instead Austria kept insisting that I support him into Germany instead, and continued to do this right up to the end of the game. This was baffling to me. From where I was sitting, it looked like Austria’s options were limited (I was still stronger in Germany than he was, and England was going to stop Austria at the gates of StP), so with Turkey down I don’t understand why Italy was not his next and immediate concern. Indeed a much greater concern for Austria than for me, as I had no Italian fleets anywhere near me. The nearest Italian fleet was 2 years away from a French center, or 1.5 if newly built. Italy moved his fleet to Apulia — I can’t recall if I asked for this or not — but Tunis was wide open and I had the advantage to press home the attack on Germany. I wasn’t going to dot Italy for Tunis and abandon what seemed like a good prospect in Germany or even worse try to fight a two front war.
Had Austria been more forthcoming on helping me in Germany, a defense against England would have been a given (England was more concerned with me attacking him than planning to attack me in the current configuration), I could have been free to try something in the south. Perhaps a testament to the top board dynamics, but everyone seemed very jealous of losing any and all possible tactical benefits. There was very little trust, even if earned, which is again why I pursued a DMZ strategy instead of an alliance strategy. Austria and I had played a brilliant and successful Key Lepanto on Saturday, so why he didn’t want to work more closely with me against Italy remains unknown to me.
By the winter, AIF were all at 7 centers. Austria’s position was exposed, however, with Greece and Con easy pickings for Italy. That would put Italy at 9. England at 6 was not ideal for me, because I was more dependent on him than Italy was on Austria. I therefore encouraged maintaining the DMZ posture in the North Sea. Italy agreed to a new army instead of a new fleet, thereby continuing to maintain the trust and DMZ position in the south — with the nearest fleet 2 years away for the 3 game years left.
I could try to press home the attack on Germany, and then determine if I needed to go after England or Italy later. Perhaps my patience put me in a good position to be at 8 centers with Kiel, potentially 9 if I could get Munich. But perhaps my late stab put me behind the strategic curve and gave Italy the chance to grow to an uncontrollable size. The last few years would tell, but at least I was in the running, which is a better place than I had expected to be by 1906, especially after the lack of any significant movement in the past few years.
I decided to press home the attack on Germany and build A Par, as Italy denied my request to go via Pie to encircle Mun from Tyr. I argued to my Italian friend that Austria was his main problem and that a French buffer unit in Tyr might not be a bad thing. But he was not interested, as he clearly had greater ambitions than non-aggression with Austria. Or he didn’t trust me. Or both!
For 1907 I had very clear objectives. Take Kie, try for Munich (either by independent force or by negotiated assistance), and get England as entrenched in the north and east as possible. A continued RE war would be good for me in tying down the English, and I expected him to be firmly allied to me now and be willing to move to Bal to take Ber and help me hold off any eastern attack.
At this point the objectives of FtF tournament play overtook traditional Diplomacy objectives. Normally at this point I would seek to get England on the stalemate line to hold it in the north, with me in Germany, and I hold it in the south, and cross where I am able. The reason is that I would expect AI to do exactly the same from the south. And in such a traditional scenario I would have been quick to jump on Tunis in order to cross that line and engage Italy. But what was happening in this game was different, as I only had three years now to get into the best possible position I could, and that meant a long- or even medium-term war with Italy was out of the question, therefore taking and holding Tunis even in the short term without major reinforcements which would weaken my north was also out of the question.
Sadly I was reaching the conclusion that Italy was not a viable target anymore, and that any gains for the victory would have to come from the north. Kiel, perhaps Munich and Berlin. If the latter two failed, as they did, then England was my only choice, and I was too late and too ineffective to stop the Italian doing the same in Austria for the win.

Mario Huys This is an important revelation that deserves to be investigated further. Chris Brand, why were you unwilling to give in to French demands when your southern possessions are at the mercy of the Italian? What was your take on the balance of power and/or your path to victory at this point?

Chris Brand I don't remember any serious discussion with Marvin about him turning on Italy that wasn't started by me and ended by him with "not yet" or something similar. My lasting recollection of the game (and I don't know whether it started here, earlier, or slightly later) was frustration that France never even entertained the possibility of entering the Med. There was absolutely a point in the game (and it was around here) when I was entirely at Douglas's mercy and was never going to beat him unless Marvin entered the Med, so I was absolutely pushing for that at every opportunity.
My path to victory was for France to attack Italy, me to then join in, and England and/or Germany to prevent France finishing ahead of me. I'm sure I knew that at this point in the game, and that I was trying (and failing) to make it happen. If I turn on Italy unilaterally at this point, he just kills me.

Nicolas Sahuguet Chris Brand: The game has turned and I believe that 4 people are still in the race but both Austria and England need France to disturb Italy. The guess lost by Marvin in KIE/MUN clearly was HUGE, both for him and for me. It will be very difficult for me to go above 7. STP should be mine soon. But after that, every other center would be a miracle or a 1910 swindle.
At that point, it is just math. AI will control 15-17 centers at the end of the game if France stays home. This means that 8-8 is the best scenario with 9-7 or 10-6 being much more likely. (12-4 was the final count). With Doug having the tie-break, it does not look good at all. The only way to change this was for France to go to the Med. Clearly, he would not take much more than TUN. But he would paralyze 3-4 Italian units giving Austria an opportunity to turn on Doug.
The only way forward that does not include an Italian win is if 4 countries have a chance and try to balance the game towards an uncertain final 2 years. That's why I will do my best to please Marvin — support him into KIE, dmz NTH for as long as possible, not build a fleet, go to BAL etc. Unfortunately, he will thank me by waiving his build the following year and then attacking me at the end… If Marvin takes TUN and Chris turns on Doug, the game can be won at 8 or 9 centers and I still have a chance. With hindsight, I should have built fleets and gone for second place.

Douglas Moore This was a pretty decisive turn for me. From here, while I'm currently at 7 centers, I'm really at 9 centers, because I have Con and Gre pretty much in the bag, with position on Sev/Rum if I need it. I knew from here that I could win this, but there was no sense in rushing it, and I wanted to keep faith with Chris Brand and Marvin Fried, both of whom I'd worked with all game (or at least had the unholy alliance with). In particular, I wanted to try and keep Chris's Austria strong and growing in the North.

Winter 1906

Spring 1907

Blurb Spring Map Comments Summer Map
Italy both attacks Austria in Turkey and supports him into Russia. Austria responds by retreating his only fleet off the board instead of to Smyrna! Too submissive? What do you think?
Spring 1907

Comments

Douglas Moore That was an arranged move between Chris and me.

Summer 1907

Fall 1907

Blurb Fall Map Comments Winter Map
This is the season where Turkey exits the game, the first power to do so. Conrad Woodring fought a long and valiant fight against determined opposition who eliminated him with mathematical precision. No rescue party ever reached his shores. The biggest surprise of this turn however are the two waived builds, one by Italy, one by France. Gasps and groins around the table. There's usually no mediation during minor phases, so Douglas Moore and Marvin Fried, was it something you had agreed on beforehand? And stuck to irrelevant of the Fall outcome?
Fall 1907

Comments

Conrad Woodring Pivotal point for me here. Dave Maletsky had been mulling around the board all game. This was the moment where he swooped in and seized opportunity with one word: "lunch?"
And I was off to the Jamaican place with Dave for some delicious food and day drinking.

Douglas Moore We didn't agree, but given the spirit of the unholy alliance, it seemed the thing to do. Plus, I couldn't apply that unit effectively anyway, so holding it for next year seemed right.

Nicolas Sahuguet Yep the waived build by France is the last nail in my coffin. I thought that I had done enough (given him KIE, dmz NTH etc.) to make the move towards Italy a plan that could work. Now, it is over. Doug has basically won the game. From that point on to the end of the game, I will play like a zombie. No energy, no brains, only bad moves, misorders etc. The stab by France in 1909 will wake me up a bit. I realized that he was going for it when he did not show me his orders while he had been doing it for several seasons (without me asking).

Conrad Woodring The mojito I was drinking shortly after the builds were read was delicious 😋.

Chris Brand Yeah, it was around this point, I think, where Marvin made it clear that he'd be happy with Douglas winning as long as he could finish high enough to take second place in the tournament. So I had to choose between taking Italy on directly by myself or trying to grab enough dots elsewhere to finish ahead of him, both of which looked very difficult.

Marvin Fried 1907
This year was about consolidation. I had taken the plunge to go after Germany, due mainly to my frustration at not having any forward movement or a partner I could really rely on. And the mop-up operation in the east left me in no doubt that Russia would be the next to be removed from the theater and that AI would be looking to cross the line in the center. England and I agreed that continued good relations were vital, and that we must speed things up if we were to get anywhere. He therefore supported me to Kiel and I tried for Munich.
Now here is when I came into the first direct confrontation with Austria, despite ostensibly good diplomatic relations. He supported Germany back to Munich, meaning that I was unable to take it and dispose of Germany for the rest of the game. I don’t really understand why alienating me was in Austria’s interest. With Italy having Greece in his pocket and all of Turkey now Italian, I figured that after Russia was removed Italy would be in the dominant position against Austria, who had given up his last fleet and yet still had Italian armies crawling around his borders in Ven and Tyr. I appreciate they were allies, but with the obvious unholy alliance it would have seemed reasonable to encourage France to work with Austria at a cost of a center or two, rather than put oneself in direct confrontation with France? I guess not.
And then, F&W1907… Apparently my waived build was a shock. Why? The unholy alliance was in place and neither would have benefited from moving against the other. Yes, every other player wanted us to go at it — mainly England (who could have an opening to move the rest of his forces against Russia/Germany or indeed stab France), and Austria (who must have sensed the Italian threat and needed another front on the Italians to take the pressure off once Russia went the way of Turkey). It may have even opened up options for G&R. So a war between FI would have been useful for everyone — except France and Italy.
England implied he had given me everything I wanted in exchange for me to move against Italy. I saw our relationship as having been aimed at Germany, and for England to make his own gains in the north. He said to me that he would not attack me (and kept his word) but that he would also not roll over and let me win by giving up (which was fair enough and I would have done the same). What I didn’t see as critical in the context of him supporting me into Kie and DMZing Nth was the Italian question. I wasn’t going there, and even if I did lead him on a bit by making him think there was a chance, the moves in Germany benefited us both and made sense on their own. I’ll discuss the attack on England in the relevant year.
But what perplexes me still is the Austrian position. Austria indicated that my abdication from an attempt at victory (behind Italy) is the reason he had to choose between going after Italy alone or grabbing dots from elsewhere. To clarify, while I did say I was pleased to be this far in the game and still alive, perhaps I was not clear enough in my intentions. Austria had just prevented me from taking Munich, and after that I asked outright for his assistance (previously I had asked too but was rebuffed — I did not however expect Austria to actually help Germany and antagonize me). A new request for assistance was also rebuffed (and as it turned out both A & I worked to help Germany protect Munich and possibly retake Kiel).
The counterproposal I was faced with was to help Austria take Munich. This was a recurring theme, and one which was fairly alien to me given the state of the board. If I had been Austria and would have wanted to take on Italy as the biggest solo threat, then I would have sought to destroy Russia, build an alliance with France (even at a cost), and thereby find an ally and a stalemate line from which to contain Italy. Instead, Austria stagnated in the east because he worked with Italy to prevent France from entering Munich, thereby alienating the potential ally he needed against Italy and not taking the centers to the StP line he needed to pacify the east and have available units to deter an Italian attack.
Italy went to 9 centers by the end of 1907, and kept Austria at 7 with no fleets. Why did Austria agree to this instead of an 8-8? Because of expected gains in Russia? It’s not like Italy was trying to help Austria take Munich. Nor was Italy moving to take on France, which would have given Austria tangible assurances that he was not going to go after him.
My DMZ with England was designed to assure each other that we wouldn’t come after each other; I saw no corresponding behavior in the east. Instead one Austrian center after another went to Italy, and a solid front line was created against Austria. Did he not see this? Vienna was at risk, Trieste surrounded. AI should have been at 8 each, there was no reason for this utter imbalance. Due to a combination of time pressure and fatigue, I entirely blame myself for not pursuing a more active diplomacy in the east to unpick this situation and get a clearer picture which could have swayed things in my favor.
The builds weakened Germany but with all those Austrian and Italian units behind the center making it clear that I was not going to get Munich I had to pursue other alternatives.

Chris Brand At this point, it certainly seemed like you had no intention of ever moving on Italy regardless of what I did. Any offers of "help me out and then I'll turn on Italy" just didn't seem credible — I didn't believe that the follow-through would actually happen.
In a world where Italy and France are not going to fight, I'd prefer Italy to be the bigger power because there's at least the possibility that I can take some dots from him and pull ahead, whereas I probably can't touch French dots myself.

Winter 1907

Spring 1908

Blurb Spring Map Comments Summer Map
Looking in vain for a new theater of conflict, pieces continue to move in their preset direction. The new Italian army pops up in Greece. More headaches for Austria.
Spring 1908

Comments

Conrad Woodring This was a big turn for me (Turkey). There was no line at the Jamaican place so Dave and I got a table immediately. By the time the clock hit zero for the negotiations, Maletsky and i just barely settled our argument over whether to start with margaritas or mojitos. Mojito won. Damn you Maletsky!
This was not a good negotiating day for me.

Marvin Fried S1908.
In my estimation, with Austria entirely committed to his alliance with Italy, I saw no way I could go after Italy alone. I asked for Munich as a means to build bridges to Austria and begin to set up a line against Italy, but this was rebuffed again. I therefore had no choice but to defend German positions for the same reason AI were defending German positions; so the other side didn’t get them. This would remain the case for the rest of the game.
Austria took Moscow but then what? Italy had effectively already begun his move against Austria in the S1908. Italy further surrounded Trieste from two sides and put an army into Greece. Austria had 4 front line armies against Italy’s entire arsenal of 8 units plus one in his pocket. Where would Italy go? In the last two years begin the long journey to France’s well defended southern coast, or go after Austria’s home centers and outposts? Why was Austria not knocking down my door offering me anything and everything to send fleets south?
Austria knew from the Key we had implemented earlier that I was reliable, but no plans were forthcoming. For Berlin and Munich I might have done it, and at what cost to Austria? In the current configuration Austria would not get them either, and if I took them I wouldn’t move any further past that line anyway. But I would be incentivized to send forces south. This offer was never made. And it was my own fatigue, and I blame myself entirely for this, which caused me to be unable to properly articulate this point when asking for the centers (actually just Munich, as Berlin was promised to England). I needed to offer Berlin to England to keep him engaged in the east and not turn on me. And it was precisely this strength of England’s which should have encouraged Austria to offer me anything I wanted, as I would only have been able to take Munich anyway and Austria could have had a fighting chance against Italy.
But I don’t think Austria ever believed that I would change my mind and come south, no matter what I was offered, and while this may or may not be true (we will never know), it was never really attempted. As an excellent Diplomacy player once told me, you can’t just ask someone to help you and not make it worth their while or show them why offering that help is in their interest. And this was one of my many mistakes in the game, not being able (or have enough time) to articulate why giving me Munich was in Austria’s interest. This resulted in a stalemate in Germany. I therefore had no direction to go except England if I wanted to have a shot at the win.

Mario Huys I might be wrong, but I think this is where your defensive play in this particular game is starting to work against you. Why feed the ogre when every extra build is either used to back-fill your hinterland or even just get waived? If the center would be Austrian, at least the built unit would be put to active use (even if it turns out to be an army, which it likely would be). I can understand though that you would be reluctant to expand the Italian-Austrian combined center tally, as they have been just a little too cozy to each other all game long. But who says Munich won't become French eventually? It's comparatively easier to capture the center in the last turn if Berlin and Munich are owned by different powers, because they will all be trying to cache in that extra center, and thus attacking, not defending each other.

Chris Brand "For Berlin and Munich I might have done it". That's the key. So I'd hand over Berlin and Munich and then cross my fingers on that "might" ? Didn't seem like a good bet.
At this point, I probably needed to see you move south first, at which point I'd be happy to (a) turn on Italy myself and (b) give you support in Germany.
You had me convinced that you weren't coming south no matter what I offered, so why would I waste my time making offers ? I instead had to do the best I could assuming the IF DMZ would hold for the rest of the game.

Mario Huys In re-examining this map there's one set of moves that's a bit of a mystery. Why is Austria moving Pru to Sil and why is Russia trailing him with Lvn to Pru? Is Peter asking Chris not to attack Lvn so that he can bounce England out of St. Pete, a promise he doesn't keep? Or is Chris reinforcing his claim on Munich and did Peter get wind of it? It's a strange shift as it accomplishes little for either in the shuffle for Moscow.

Summer 1908

Fall 1908

Blurb Fall Map Comments Winter Map
Things are getting weird. Italy reverts his Spring convoy instead of moving another army to Bulgaria and finish the job. England, convinced now that he's fighting for second place, does not take up the gauntlet even as he has secured a build. A more aggressive England could have moved to Denmark and North Sea and built a fleet in London or Liverpool to take the fight to France. Nicolas Sahuguet, alas, where is your legendary fighting spirit?
Fall 1908

Comments

Chris Brand I believe this was after I gave Douglas a serious talking-to.

Steve Cooley Pep talk or tongue-lashing?

Chris Brand Tongue-lashing. He'd been bad.

Mario Huys At the same time you're asking him to bounce Sev. A judicious convoy to Rum (or attack with the fleet and move the army to Bul) combined with an attack on Tri/Ser, either of which must fall, and it's game over there and then. Much more straightforward than reverting to the 1907 status quo. Not true, Douglas Moore?

Douglas Moore Chris Brand did indeed give me a strong talking-to, and I moved back quickly. We'd been good allies all game, and this was an … undiscussed Italian adventure. There was no real reason to antagonize here, so I re-committed to the AI and the agreement that one of the two of us would win. We'd both played really well (independently and together), and I felt one of the two of us deserved to win.
Mario Huys: Sure, perhaps. But, I wanted to win. If I did that, Chris Brand would absolutely feed Munich and Berlin to France, putting Marvin Fried at 10, while pulling one unit from the north. Tri or Ser gets me to 10 — a tie. The pull and focus south would open more growth potential to England or France, and stymie my own growth. So, it wasn't a good move by me and I walked it back because the attack would weaken my chance to win (and Chris's chances, too). I was up 9-8-7-7 over France, Austria, and England (and holding tie breakers over France and England). Keeping Munich and Berlin in German hands, or at least not French hands, was good for me. Assuring that 1908 ended with Chris not pissed at me was better than ending with 10 dots and the guarantee that France will be at 10 in 1909 and maybe more in 1910. I could fight out '09 and '10 with Chris and still probably win, but the status quo is already a win. No need to antagonize.

Andrew Goff Damn you and your strategy, Doug Moore. Such dark arts have no place in the game of centre-grabby-stab-stab.
You'll never be a Centre-grabby-stab-stab World Champion until you learn to meaninglessly take centres off your ally and ensure another player finishes ahead of you.

Nicolas Sahuguet My legendary fighting spirit died with the waived build by Marvin. And it had also been seriously hurt in 1902 by NWY being lost after Peter and Ruben conspired against me. I spent most of the game trying to salvage it, but I have to say that at that point of the game, my energy level was pretty low. Not much I could do anymore.

Conrad Woodring I'll let this picture do the talking for how this turn was for me.
Image may contain: 1 person, smiling, sitting, food and indoor

Marvin Fried F1908
England and I tried once more for Munich but AI stood behind Germany. AI also reversed the move Italy made to Greece, because Austria vehemently protested, but I was surprised to see a removal of Tri-Ser. Perhaps to build another fleet (had Mos been kept), or a self-bounce with Gre in case the promised convoy didn’t materialize? The fact remains that Austria took a risk by believing that the pre-S1908 status quo would be re-established, and it was a huge risk. It worked out, but the loss of Mos put him back to where he was in 1907. And I was exactly in the same place too. Kiel was mine but England growing more powerful. Berlin was his because I had no way of resisting giving it to him, and he was building armies at home with no way to convoy them. They were a defense against me.
I moved to Spa/sc for reasons I cannot remember, but this represented a major shift in my policy to anyone watching. Perhaps I was expecting the Italian stab against Austria this turn. Perhaps it was to encourage England not to build more fleets, or for Austria to finally come knocking at my door. Honestly I can’t remember. Oh wait, actually I do. It was a feint, because I knew that with no change in the east I would have to take on England, and this move was intended to look like a preparation to go south.
Austria cleverly disbanded his retreating army and used the open space in Tri to… build A Bud!? I waived a build. It was like all players were hedging their bets, not moving anywhere, and this gave Italy such great openings which he exploited brilliantly.

Mario Huys Actually, Tri-Ser is a perfectly valid defense, as Tri is a lock for Italy if he decides to stab; he simply needs to cut Vie's support with Tyr to guarantee that Ven takes the center. By moving to Ser he prevents Gre from sneaking in there. And what would a fleet build accomplish? It could only threaten to enter Adr, a space only adjacent to the Ven and Tri centers, or Alb, which is also open to an army. For maximum offensive and defensive power in the 2 remaining years, Austria is better off building armies, lots of them.

Chris Brand Yeah, I'm pretty sure Ser was preparation for fighting Doug. A fleet might have been useful if I was fighting him, but by the time the builds came around, he'd done what I demanded.

Mario Huys To prevent Italy from unconditionally entering the Adriatic. Agreed, that might be of some use tactically.

Chris Brand Maybe. Italy has three fleets, though, and can easily spare two to take Adriatic.

Winter 1908

Spring 1909

Blurb Spring Map Comments Summer Map
It's Spring 1909 and France, with still a build in reserve, finally moves against England, who has dotted his island with two impressive armies. Marvin, relive for us these moments.
Spring 1909

Comments

Marvin Fried S1909
I had to do something, and Germany and Italy were out of the picture as options — the latter due to my own play and the former due to resistance from the other side of the line. Desperation set in and my fatigue which had prevented better communication with Austria during the second half of this game led to further mistakes on my part. But like the no-move decision I rolled the dice one more time. I thought that if Austria had convinced Italy to retreat from Greece, Austria wasn’t offering me anything to join him against Italy, and that Italy hadn’t made a forward move when the opportunity was there, then there was a chance no real attack would happen between AI. Austria did not seem too afraid, and Italy did not seem willing to stab. If I made a move, then perhaps I had a chance to overtake Italy and race for the solo.
Sadly, mine was an extremely poorly executed attack on England which resulted from time constraint and zero real alternatives. My own fatigue, which was considerable by this point, led to the most basic errors I have made in a long time — tipping off my intended target as to the impending stab. England is an outstanding player who may have noticed it anyway if I had been more subtle, but he is absolutely right that by sharing my moves so far and this year failing to do so it didn’t take a rocket scientist to figure out what was happening. I should have made excuses and written my orders elsewhere and then reach the box only in the last second, or even write two sets of orders. Probably England would have noticed that too but perhaps I might have caught him by surprise.
Be that as it may, England correctly anticipated my attack and bounced me in Eng and pulled back Swe to Den. There was always a risk this might happen, but I was hopeful that I could get a fleet into Nao and then have sufficient leverage against Lvp. England did not conduct a wholesale retreat on the mere suspicion that I would attack him, and ultimately that led to me being able to capture Nao and thereby take Lvp. Where I was weak was the Hol/Bel line, which were open and the English fleet a year away.
It was now a race to the finish line, with an extra build in my pocket and a pretty solid German stalemate line. I had built sufficient bridges with Germany by this point to have a realistic hope of having him look east and not west, for the purpose of holding on to Kiel. I thought I had a 30% chance of retaining that center; as Germany I would probably have forced AI to back off with threats of throwing the game to France and then work with England to retake Kiel (or give it to England). Luckily, from what I can remember, Germany was amicable to my suggestions of keeping the status quo in Germany.
Looking at the positions at the end of S1909, it wasn’t all bad news though. Sure, there was a new Italian fleet in Naples. He could have come to Tun and Tys in S1909 following my move to Spa/sc, but he didn’t. That was great news, as I could press home my attack on England. England’s main naval position was one year east, so I had time to try to get at least one dot from him. With the hope of holding on to Kie, it would put me at 10. That was still one ahead of Italy, if all else stayed the same. I think given my lack of options by this point (most of which were my own fault as outlined earlier), it was the best choice of a bad bunch. And although slowed, I wasn’t halted and I still had a realistic chance of getting somewhere.
Looking back I should have been pleased — I was in the running for first or second place on the top board of the WDC2017. But looking at the military situation in the cold light of day two months later, it seems by this point completely impossible that the game would have ended any other way than an Italian victory — at least given the caliber of the people playing on this board. On other boards things may have been different, but not here. Italy had staked out his position in Austria so well that it was a matter of when, not if, the attack would come, and when it did it would be crippling for Austria. I was in no such position. Through my own DMZs I had given England significant leeway, and my only saving grace was that most of his forces were in the east as a result of this (which was the intention). But the benefit only went so far in the attack.
Things were actually better in Germany now that my goals had shifted to not taking Mun/Ber but to holding it for Germany, and him being happy to accept my support. On a weaker board, England may have buckled and I may have made more gains. Or Germany may have moved instead of hold, giving me the opening to take a center in the various previous years when I attacked him. Not here. Every move was intentional and every position well covered by every player. Luck didn’t go my way in the German campaign (or in the English one for that matter), so every dot I managed to get was diplomatically and militarily hard fought and won. It just wasn’t enough to compete with the Italian position which in large part I must admit I had allowed to happen.

Summer 1909

Fall 1909

Blurb Fall Map Comments Winter Map
France presses his attack on a lethargic England, who would have done better pulling back his fleets to the North Sea and Norwegian. If fatigue is really the determining factor in this late stage, as several players have mentioned, then a Diplomacy FtF tournament is really a survival of the fittest. Charles Darwin would find it an excellent pastime and study object.
Fall 1909

Comments

Nicolas Sahuguet If I remember correctly, this was the turn where I was a bit late writing my orders and realized that I had mis-ordered by writing F SWE and F BAL on my sheet at the start of the season. I got confused checking my orders and not finding what DEN was doing and tried to change them at the deadline but was not allowed to do so. So no orders for these fleets. Playing F DEN-NTH and F BAL-DEN would not have changed much. But maybe I would have gotten one more center and the 3rd place on the podium. But that's why Diplomacy is a tough game!
It is also true that I had no energy left now that I had no chance to win it. I did not even try to negotiate a minute to write the last 2 orders. Maybe I would have been more pushy if I was still playing for something. But who knows, following the rules of the tournament is one of my weakness in competitive Diplomacy.
By the way, I just wanted to mention that this top board was really filled with classy players. No need for a referee, no complains, no tricks, no mis-adjudication ( ;O) )! Just a game played in good spirit! Even if it is true that I snapped at Ruben a couple of times during the game- for good reasons obviously!

Mario Huys Correct. Your notes give Den as a misorder and don't even mention Bar, so lost and lonesome in its corner it might have escaped your attention. If this is the first misorder of the game, you guys might have set a new record.

Chris Brand Particularly for a game with me playing!

Marvin Fried F1909
After the well defended English move in the fall I was up against it from a time perspective. Nao was mine for the taking so I was able to force Eng. I fully expected Bar-Nwg and Den-Nth. The biggest risk for me was the potential loss of Hol or Bel to an English fleet in Nth. I nevertheless felt like I had a decent chance at things, as it was already practically the last turn and AI were still friends, the center was solid, and I was pushing forward.
This was, however, a fallacy formed in my own mind. I never had any chance to win by this point. I think I miscounted earlier, as I never got past 9, and was still only at 8 going into the last game year. Austria at 7 and Italy at 9 meant that Italy was the leader, and therefore the danger to win. However while I faced a well defended England (even if the naval reinforcements didn’t show), Italy had a better position against Austria.
I can see what Austria was trying to do, which is to protect himself by insisting on Italian fleets in Gre/Bul, but the presence of fleets in Ion and particularly Bla and the army in Tyr imbalanced things considerably. It was clear Italy couldn’t come after me anymore (one year away from my territorial waters and one year to go, which is why I could lay down F Bre), but he still could go after Austria. Not that it mattered. If Italy hadn’t gone anywhere and I reached 9 centers then he would still have one as I was the first to pick my country. And 10 was really unlikely.
These are all things that I see in the cold light of day, but at the time there is so much going on, so quickly, and one is so tired that a lot of things which are obvious later are hard to see at the time. Looking back, I should have helped Austria into Ber/Mun on the condition that he lay down a new fleet and attack Italy immediately. Would he have gone for it? Who knows. Would I have benefited? Probably not, as that would just have put two players at 9, with me still at 8 going on 9. Did I consider it? Perhaps briefly, but why would I try to reward an Austria who was instrumental in preventing me from taking Mun in the first place in favor of an Italy who had been a reliable partner the whole game?
So without being able to secure Mun or Ber for myself (which is the only thing which would have put me on 10), there is nothing I could do by S1910 to prevent an Italian win, either directly or indirectly. Maybe I was too slow to foresee this, but the decision, given all of the above, to go after first Germany and then England is not something I regret. With a bit more luck I could have taken either Ber or Mun, and it was always possible that Italy would not stab Austria. Given the limited options, even if they were limited in large part by my own making, the decisions I took were the right ones, even if they were poorly executed.
I finally used my pocket build to put down a new fleet and push north — something that should have happened two years ago, not this late in the game! But, importantly, England was surrounded from the west, with — and here it is just luck — no backup English units in Nwg/Nth. Sometimes luck does play a role, although generally speaking as Nicolas has noted this was a very high quality game. Glad I’m not the only one who felt fatigue take over! Anyway, the fleet was probably just going to be used to protect Bel — and to be honest I fully expected to lose Kiel to England (Den/Bal jointly, possibly with German help or giving it to Germany). I asked for but did not receive German help (understandable), but it seems he wasn’t interested in helping England either.
In 1910 I would just push everything on my two fronts, free to abandon any defensive positions, and keep my fingers crossed. But in reality chances were slim to nil. I was hoping for an outcome that would give me 10 at best, 9 at worst, but in any event this would be a defeat to Italy (or Austria) who would be at 10 centers or more, depending on who stabbed (or didn’t stab).

Chris Brand At this point, I think it was pretty clear that Douglas was almost certain to win. I do remember counting dots and seeing an outside chance of beating him, but IIRC I'd have needed help from almost every other player and to out-guess Italy. Still, that outside chance did mean that I was still playing for the win — this game was always binary for me — either I win it or I don't. I never saw any difference between 2nd place and elimination.

Winter 1909

Spring 1910

Blurb Spring Map Comments Summer Map
This is the final year and everyone knows it. Centers are counted, bets are hedged. Italy is in the lead with 9, followed by France at 8 and Austria and England at 7. Spring orders are revealed.
The Italian stab is in the air and so it's extremely important how Austria defends himself. We see him go all out to retake Mos and pull back an army to Bud to serve as a linchpin for the defense of his many vulnerable centers. Italy is therefore able to sneak his fleet into Rum while making room for his army to advance to Bul. With France securing Lvp and moving to protect the Lowlands, Italy must ensure that he doesn't fall behind should France also capture Mun, but he seems in an excellent position to do so.
Could Austria have done better? He could have dislodged Tyr, defended Rum and/or moved to Arm to threaten taking a Turkish home center. Then it would be up to England or France to decide if it would be worth aiding him to another center like Mos or Ber. A valid strategy?
Spring 1910

Comments

Mario Huys Boh-Mun would seem like a strange way to make a go for Mun. One would expect Sil to support the effort and Tri to cut any Italian support on top of asking France or England for extra assistance. I suspect he was merely trying to prevent Germany from dislodging Sil, or he simply misordered supporting Mun.
Proposed attack: Boh to Tyr with double support, Sev to Arm, Ukr to Rum, then War to Ukr, Sil to War or something similar. Intended to catch Italy off-guard by threatening Ank/Smy. Allows to protect Tri and Ser with Tri-Ser, Vie S Tyr-Tri in Fall. Then plead with England to obtain Mos in order to pull even with Italy and potentially win (as Sil can still support Mun in Fall to prevent French gain). Opinions?
Since no one else will, let me follow up myself. You might think that this kind of speculation serves little purpose, but I'm just trying to establish whether there was still a chance for Chris Brand to win this late in the game and establish the first back-to-back victory in WDC history.
With the proposed set Austria would have been in Tyr, Tri, Vie, Sil, War, Ukr and Arm, while Italy would have had to retreat to Pie and kept a fleet in Bla. Smy would be open for Austria to take, which could have been prevented by Italy moving a fleet to Aeg instead of Ion (a move that appears a little cavalier in this light). But at the same time with no unit in Bud or Sev Italy can still force Rum. Even with the loss of Smy that still keeps Italy at 9, while English assistance or complicity on Mos would bring Austria only up to 8 (+Smy, +Mos, -Rum).
So the whole question is then to know what happens in Germany. As Douglas Moore explained, France had a set that could gain him Mun with minimal risk for Hol/Kie if no support was given from the East. With 10 centers France would have won the game. Austria still has Sil to order. If he uses this to support Mun, then Italy wins. If not, it depends on French lucidity. In either case the case for an Austrian victory seems flimsy.

Summer 1910

Fall 1910

Blurb Fall Map Comments Winter Map
The final season on the Top Board, with the WDC 2017 at stake. What are the odds?
Fall 1910

Comments

Mario Huys Assuming that all units hold, we see that Italy would end with 10, followed by France at 9, Austria at 7 and England at 6. The rules state that in case of a draw the player who chose his power later would prevail over a player who chose earlier. As the powers were drawn in order of the ranking after the first 4 rounds, this gives the greatest advantage to Chris Brand as Austria (rank 7), followed by Douglas Moore as Italy (rank 5), Nicolas Sahuguet as England (rank 2) and Marvin Fried as France (rank 1).
England has the longest shot as he can't even retake Lvp unless France messes up his orders. Nicolas symbolically protects Lon (which doesn't need any), attacks Hol and Kie (a better tactic would have been to choose just one, see later) and helps Peter back into Mos (which is the most significant gesture he makes, as it helps him to get ahead of Austria).
Austria gives it all he can. Chris knows that he needs more centers and approaches Peter to help him into Stp, promising him eternal glory for helping him achieve the historical feat of winning the WDC twice in a row. Indeed, no one has yet successfully defended his title, so this would be quite historical. What Peter would get from this (other than ensuring his elimination) is dubious, but Chris throws in the "Chris Brand Champion" robe to sugarcoat the deal (okay, I'm making this up). This would put him at 8. If he could then chase Douglas out of Rum without losing another center, they would both end with 9 and he would be the champion, because he had picked his power last (in other words he got what was left).
And this is where his calculations go wrong. Even if he would have outguessed Italy, the fact that he needs to send one army to Mos in order to claim the center should Russia do as he is told, means he can only use 2 units to attack Rum. And one of these is Bud, a unit that should have been playing 3 roles: Attacking Rum, supporting Tri and defending Ser. No advanced tactic could have ever achieved all of this. And so the attempt was doomed from the start, but he made it anyway with disastrous consequences. Betrayed by Russia and outmaneuvered by Italy, he ends up losing 3 centers, dropping him to 4th place. More luck with either of them would have given him 2 more centers, tying him with England (actually taking over Stp would pull him in front), while a complete success would have given him 8, still 3rd, but no tie.
France has to have more centers than any other power in order to win. With an antagonistic England and an Austria taking his own chances, Marvin's only viable shot at an extra center is Mun, which he could have taken from Ruben by attacking from Kie with double support, while bouncing Den with Hol, which for sure is a gamble. If either Douglas or Chris chose to, they could prevent him from capturing Mun (in fact that would have been a more productive use of army Sil than protecting War), while a wrong guess on Kie could cost him Hol (which is why Nicolas should have picked just one fleet to attack). If all went against him, he'd end up with 8 centers, if it all went right, he'd have 10. He plays it conservatively and ends with 9.
Italy could be content with having as many as France, but must still have more than Austria. Douglas must however assume the worst, in that Chris will be using all the 3 armies around Rum against him and might be cutting his Tyr army should he choose to use it to protect Mun. He plays it on the double. By using Bul to protect Rum and attacking Tri from Ven with support, he knows that if his Rum fleet gets dislodged it will take all 3 units involved, which means Bud is not able to support Tri in place. So either he gains Rum or he gains Tri. What he does with Tyr is even not so important. As it happens, he ends up gaining both centers and Vie on top for 12 centers total, giving him a wide lead on Marvin (9), Nicolas (6), Chris (4), Ruben (2), Peter (1) and Conrad (0).

Chris Brand I approached both Peter and Nicolas about StP, I think, although I felt that Nicolas was more likely to come through for me (not very likely, though). This order set is a mess, really. If I'm moving Trieste, Bohemia should be covering Vienna. You rightly point out that Ukr and Sev's orders should be swapped over. Even if I get help from Nicolas and I out-guess Doug everywhere, I don't see how I end up at more than 7, though, or 8 if Doug mis-orders and fails to take Trieste. Not enough.
I could have chosen to help Marvin, but given that he seemed quite happy to not win the game, I wasn't going to do that. If he'd ever tried to beat Doug, and the Italian stab still happened, and I'd been convinced that I couldn't win myself, then I likely would have played kingmaker and helped Marvin out.

Mario Huys Assuming England makes room for you and Italy and Russia keep their orders, then Mos-StP, Sil-War, Sev S Ukr-Mos, Bud S Tri, Boh-Vie gives you 8 (-Rum, +Mos, +Stp). It would give the game to Italy though, since you're not attacking Rum at all, which appears to be contrary to your stated goal. Indeed, if you change Sil-War to Sil S Mun, this order set meshes better with a fight for second place, where you assume that Marvin will try for Mun and jeopardize Kie/Hol. Could this appeal to Nicolas more? Who knows, but it's an equally pretty long shot.

Chris Brand Yeah, I still wrongly believed that I had a chance of beating Doug, and didn't even think about any other possible goal.

Douglas Moore As I said in-game, I wasn't trying to clobber Austria in this position; I really thought my spring/fall moves were netting only one off you, Chris Brand. I was really pushing for 10 because I thought Marvin Fried was going to be at 10. And he would have gotten 10 if he ordered Kie-Ber and Bur-Mun with Ruh's support. Hol then doesn't have to move, and Pic can cover Bel. I thought it extremely unlikely that Ruben Sanchez would help Nicolas Sahuguet into Kie. In no realistic scenario that I can see does Nicolas get beyond 8. And I thought your best was 8 with a Mun/Ber split with France. But I read that France would be at 10. So, with the positions as they were, I was angling for one of Tri or Rum to get to 10, and my order set was calibrated to that end. We both knew you couldn't protect both (we'd discussed it), and I knew I had one of them — which is what I needed.
I gambled Tyr-Vie because Boh had too much to do. I had three on Tri, so I could force it with Tyr-Tri and Ven/Adr supports. But, I thought you might combine with France to give him both Mun and Ber. I didn't need Tyr to guarantee Tri since Bud could only support one attack, meaning Tyr was a free unit. I probably didn't need to make that move, but without more knowledge of what was going to happen, I tried to get as big as I could. You could possibly have tried to help Marvin get to 11 and win (Ruh-Kie, Hol S Ruh-Kie, Kie-Ber, Bur-Mun; Sil s Kie-Ber and Boh s Bur-Mun). It was plausible and not impossible. With that free unit, then, the play to stop you combining with France was to poke at Vie, necessitating you move Boh-Vie. That makes the move both offensive and defensive — possibly netting a dot, or ensuring that Boh doesn't help anyone else get a dot. If you help France to 11, then I am likely to get two of Rum/Tri/Vie.

Ruben Sanchez To be frank I still believe the stab from France was not good because this was preventing any control of the South, plus it made England more powerful. In the end Marvin took LVP but this was not making any difference for the victory.
I made many mistakes. I tried to control the Balance Of Power, badly but I tried.
I'm especially sorry for Peter. The level of all (other) players was really good. After the frustration I would like to thank all players and congratulation again to Doug.
Marvin: Now you have been second, I am sure you will go for the higher position! Take care.

Mario Huys Thanks to all participants for your invaluable commentary and for having played this game in such a grand fashion in the first place. And congratulations to the winner, Douglas Moore, who we see hasn't stolen his title. Bravely fought, exquisitely delivered.

After Fall 1910

And when all is said and done, it's time for some moving pictures featuring the award ceremony, courtesy of Don Del Grande.


Mario Huys
(woelpad@gmail.com)